> ## Documentation Index
> Fetch the complete documentation index at: https://domoinc-bradley-turek-pfilter-operators-reference.mintlify.site/llms.txt
> Use this file to discover all available pages before exploring further.
# Connect Domo to Google BigQuery
## Intro
This article explains how to connect Domo to Google BigQuery using Cloud Integrations, enable writeback to BigQuery, configure native transform, and set up OAuth authentication.
**Note:** Cloud Integrations setup consists of two parts: read-only, which enables virtual tables that read from BigQuery for creating cards, alerts, or inputs in Magic ETL DataFlows; and writeback, which adds the ability to write data back to BigQuery. You can start with read-only and configure writeback later.
***
## Prerequisites
Complete these steps before setting up the BigQuery integration.
**Create a Domo service account (recommended).** You can use any Domo account, but creating a dedicated account is best practice. Assign the following roles:
* Manage Cloud Accounts
* Manage DataSet
For more information, see [Managing User Roles and Grants](/s/article/360043438973).
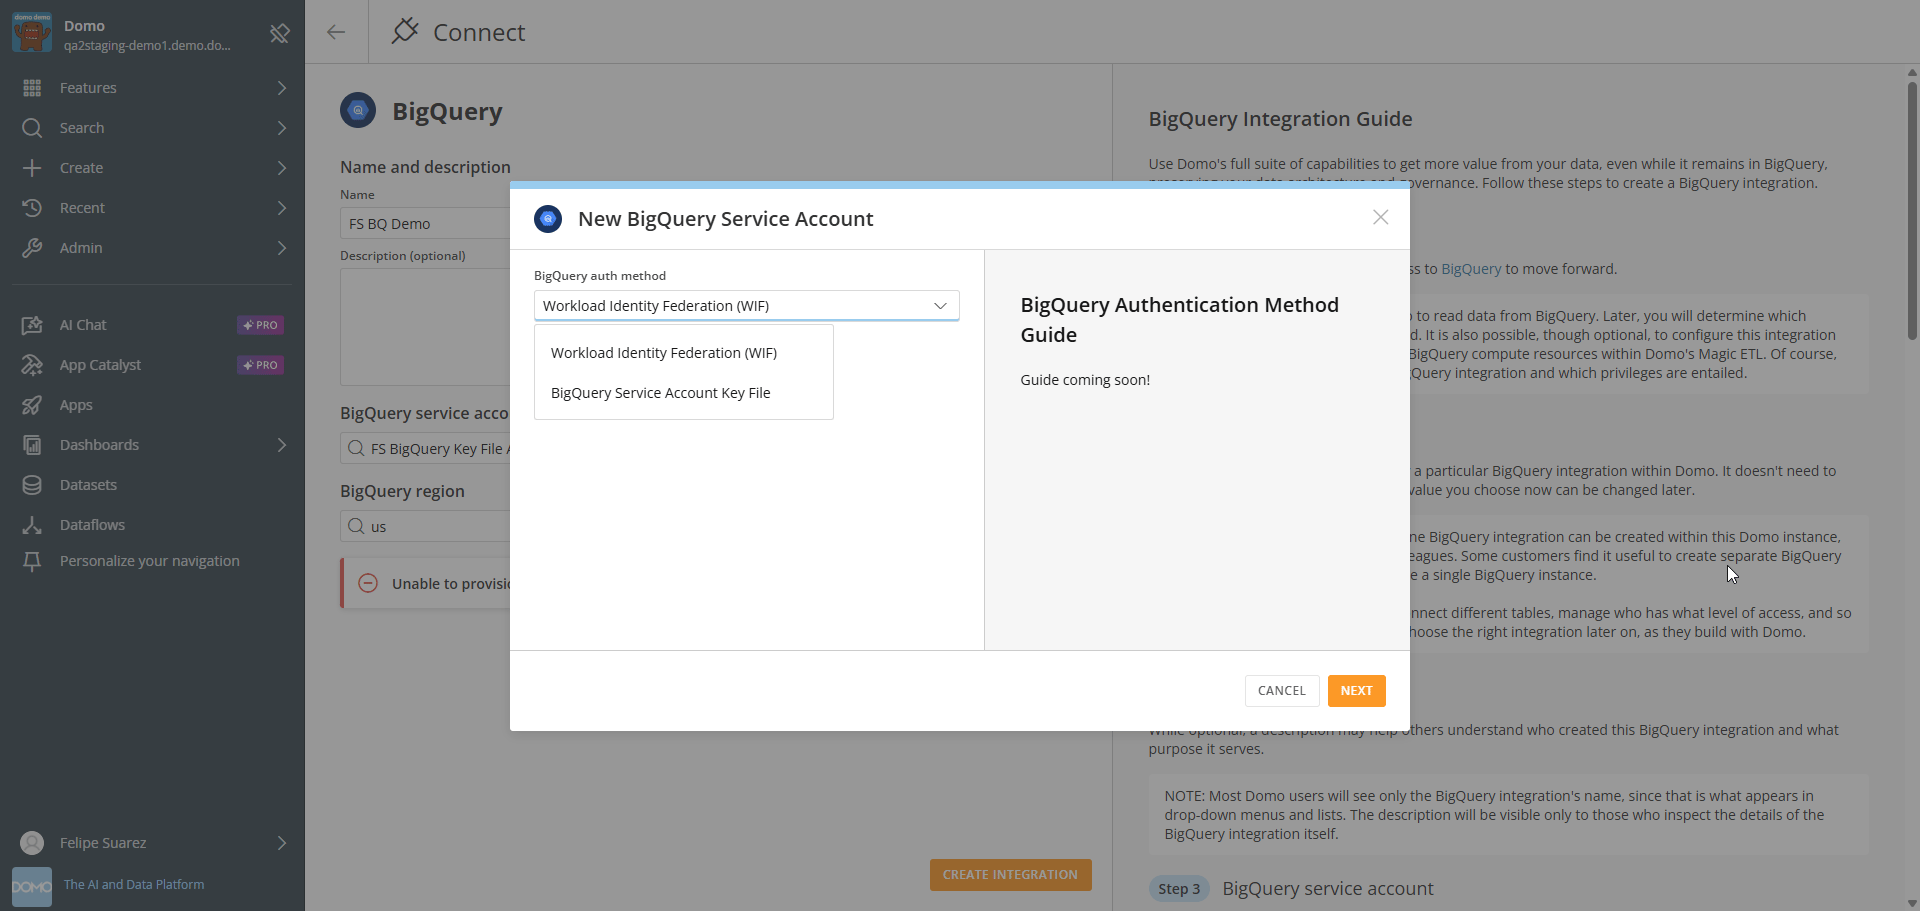
**Create a service account in Google Cloud Console.** Choose one of the following authentication methods:
* **Option 1 —** Key file. Create a BigQuery service account, grant the required roles and permissions (see [Roles and Permissions](#roles-and-permissions) below), add a key to the service account, and download the JSON key file for authentication.
* **Option 2 —** Workload Identity Federation (WIF). Open a Domo support ticket to request BigQuery integration using WIF, specifying the provider type (AWS or OIDC). Domo provides an Account ID for AWS or an Issuer URL and Allowed Audiences for OIDC. Create a Workload Identity Pool in Google Cloud IAM, add a provider using the details from Domo Support, and update the mapping to point `assertion.sub` to `google.subject`. Create a BigQuery service account, grant the required roles and permissions, including Workload Identity User (see [Roles and Permissions](#roles-and-permissions) below), and download the JSON configuration file from the Connected Service Accounts panel. When exporting the configuration, use the audience provided by Domo Support.
### Roles and Permissions
The BigQuery service account must have the following roles.
**Read-only integration**
* Roles: BigQuery Data Viewer
* No additional permissions are required for read-only access.
**Writeback and native transform**
* Roles:
* BigQuery Job User
* Service Account Token Creator (only if using WIF)
* Additional permissions:
* `bigquery.datasets.create`
* `bigquery.datasets.delete`
* `bigquery.datasets.get`
* `bigquery.tables.create`
* `bigquery.tables.delete`
* `bigquery.tables.get`
* `bigquery.tables.getData`
* `bigquery.tables.list`
* `bigquery.tables.update`
* `bigquery.tables.updateData`
* `resourcemanager.projects.get`
* `bigquery.jobs.create`
* `bigquery.jobs.get`
* `bigquery.jobs.update`
**Note:** Domo only deletes BigQuery tables and datasets it creates for temporary staging. Domo does not remove objects it did not create or objects intended to be permanent.
## Review the Architectural Overview
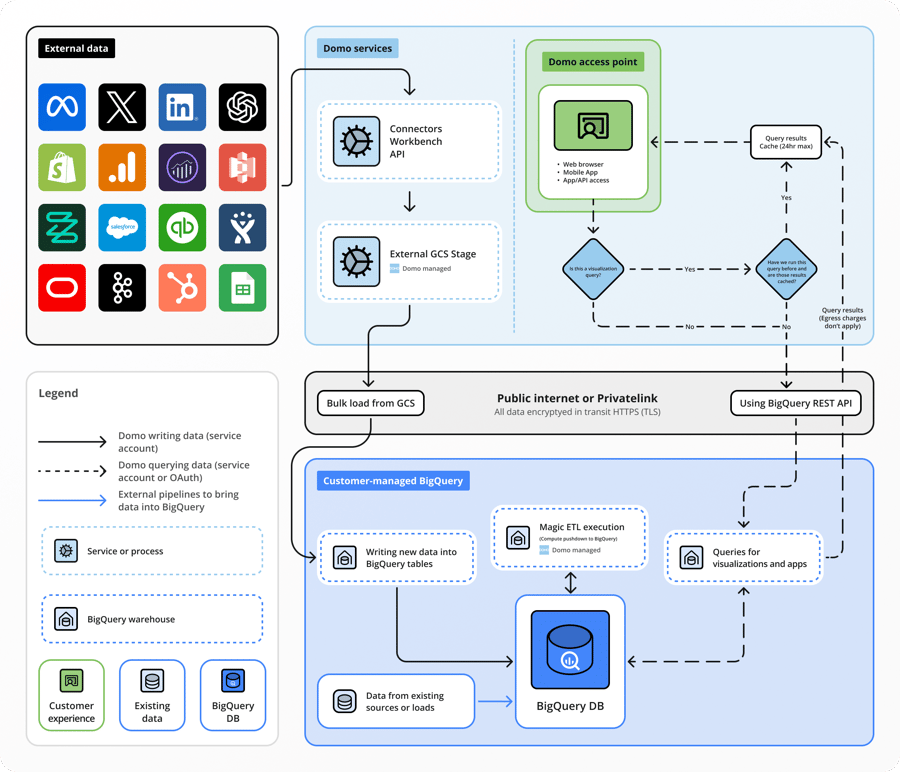
The following diagram illustrates the Cloud Integrations–BigQuery integration.
 ## Open the Domo on BigQuery Page
1. In the navigation header, select **Data Warehouse**.
2. Select **Connect Data** > **BigQuery**.
The **Domo on BigQuery** page appears.
## Open the Domo on BigQuery Page
1. In the navigation header, select **Data Warehouse**.
2. Select **Connect Data** > **BigQuery**.
The **Domo on BigQuery** page appears.
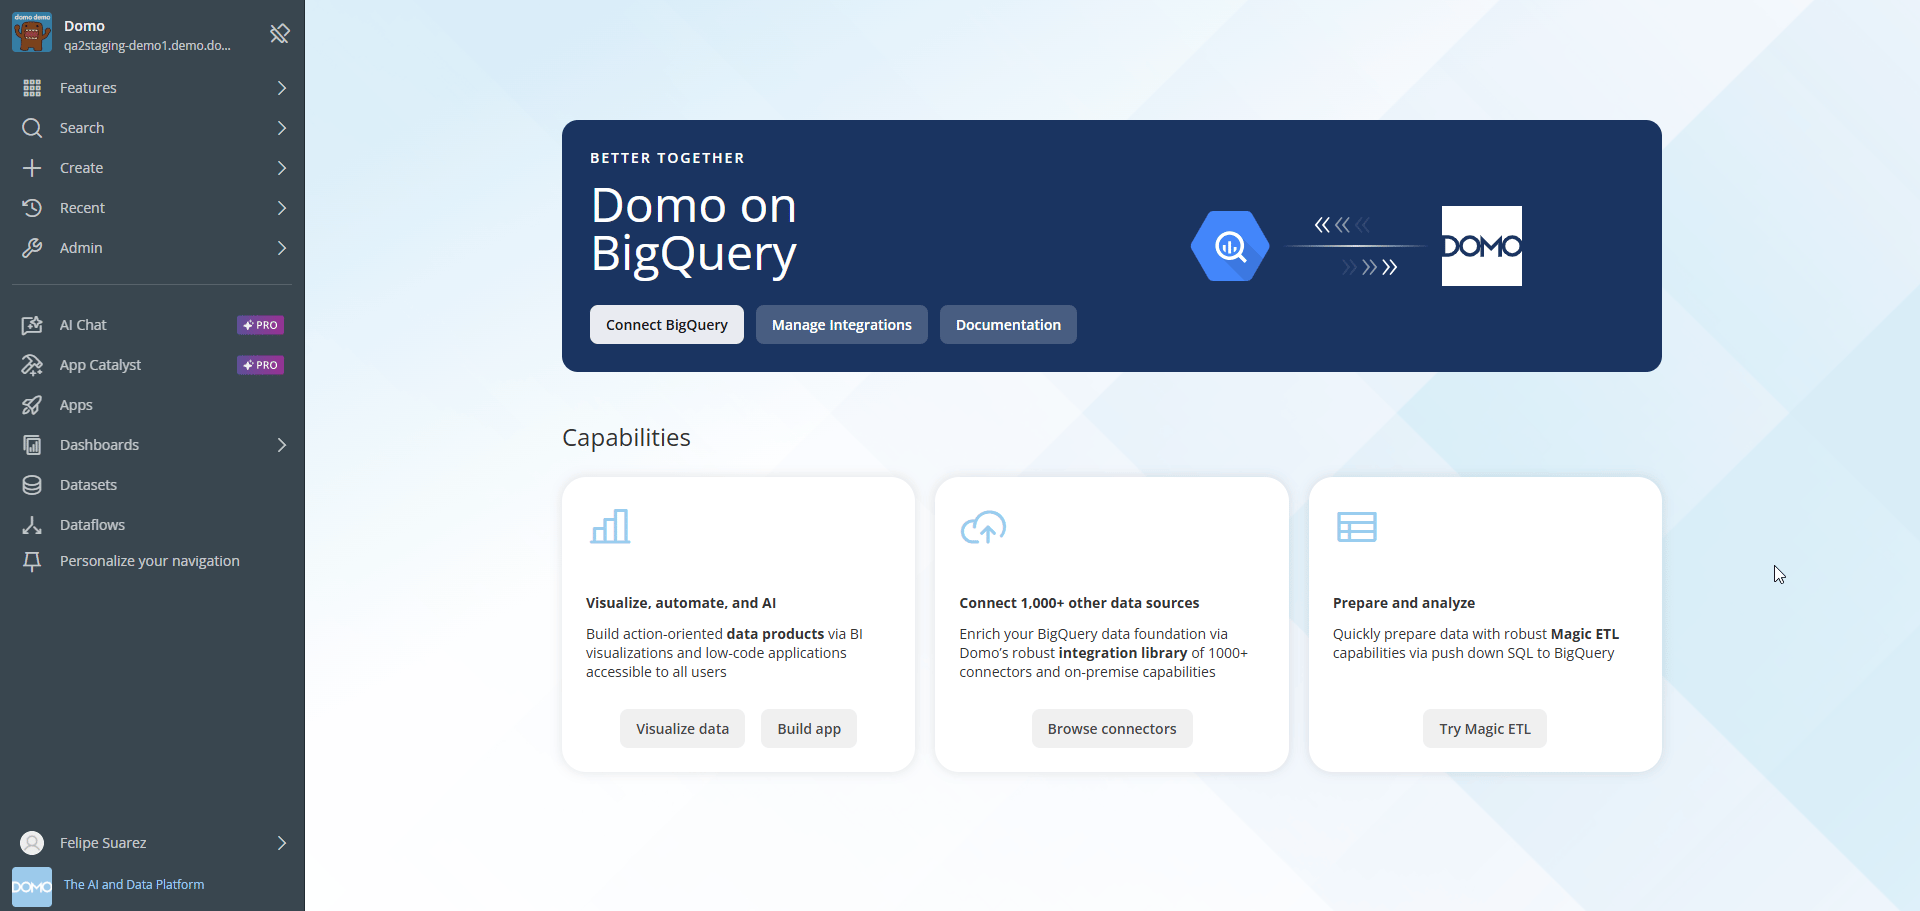 3. Select **Connect BigQuery** to create a new integration, or select **Manage Integrations** to modify existing integrations.
If you selected **Manage Integrations**, a list of your integrations appears.
3. Select **Connect BigQuery** to create a new integration, or select **Manage Integrations** to modify existing integrations.
If you selected **Manage Integrations**, a list of your integrations appears.
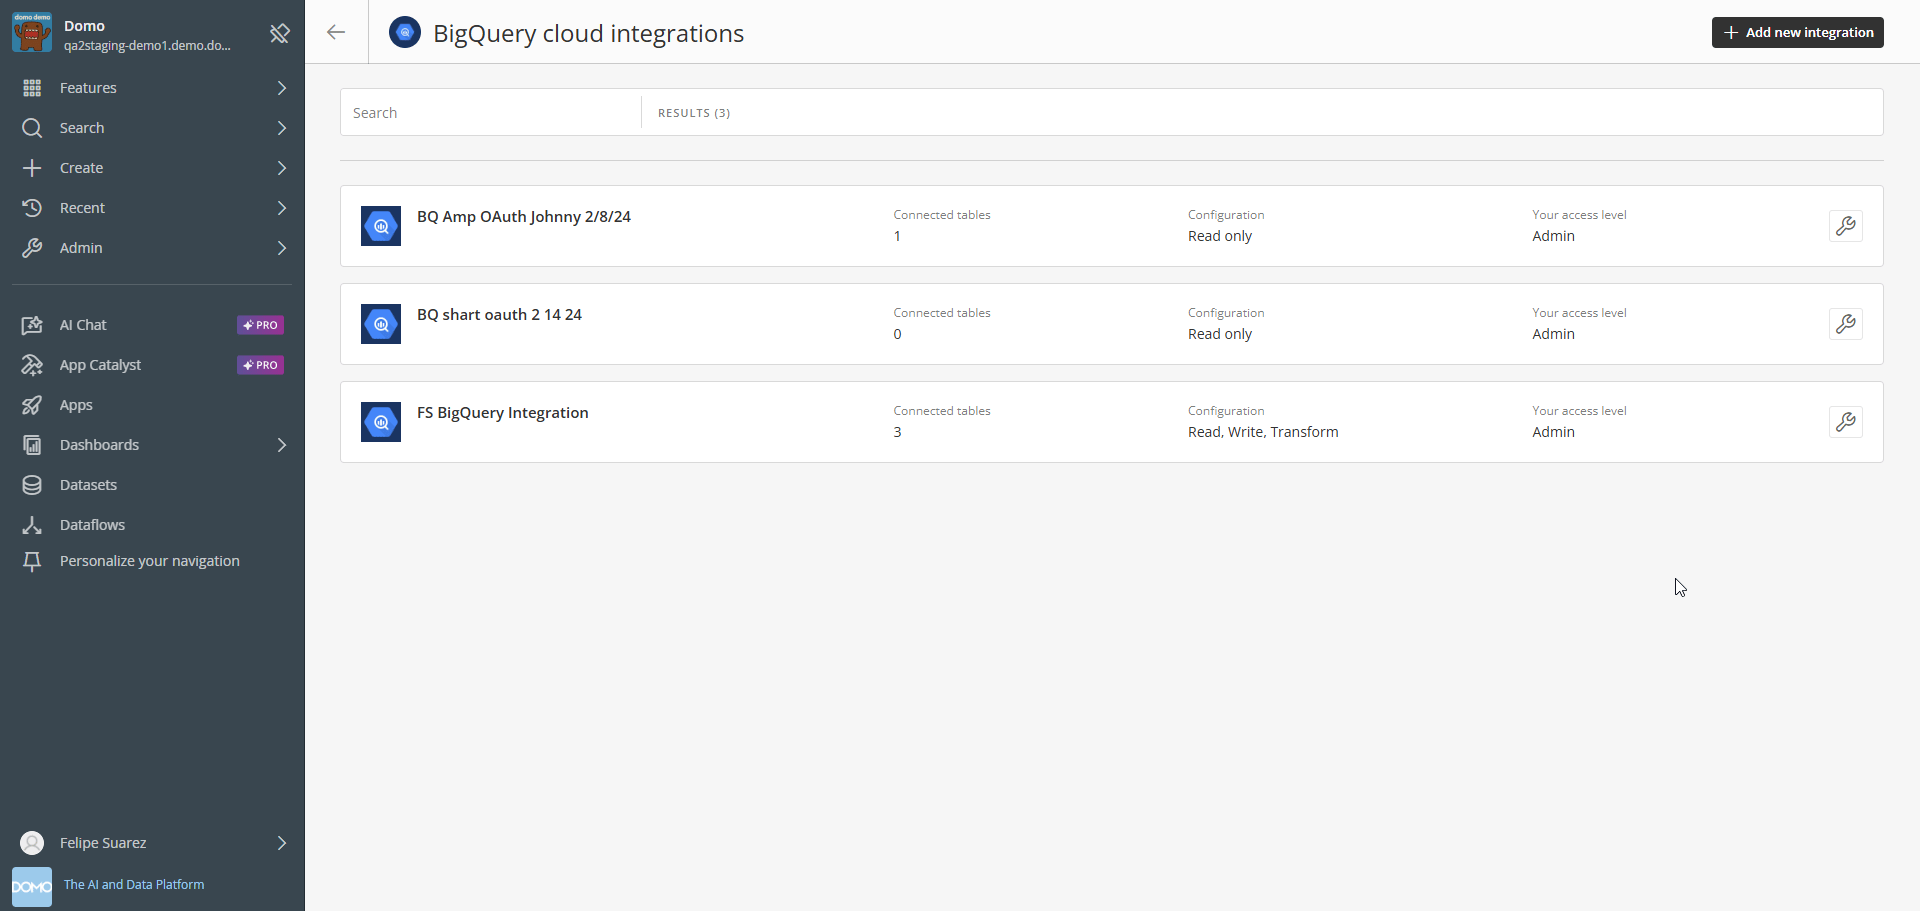 4. Select the wrench icon next to an integration to view available options.
The options shown depend on your access level. From the integration overview, you can create a new integration, update an existing one, or configure writeback, native transform, and OAuth.
## Create a BigQuery Integration
Begin on the **Domo on BigQuery** page (see [Open the Domo on BigQuery Page](#open-the-domo-on-bigquery-page)).
1. Enter a name to identify this BigQuery integration in Domo.
The name does not need to match anything in BigQuery and can be changed later.
2. (Optional) Enter a short description to help others understand the purpose of this integration.
This description is visible only in the integration details.
3. Select an existing service account from **BigQuery Service Account**, or select **Add Account** to create a new one.
This account authenticates with BigQuery and determines access to tables. To create a service account, see [Create a BigQuery Account](#create-a-bigquery-account).
**Important:** Changing the service account later may require remapping DataSets or Magic ETL DataFlows if access permissions differ.
4. Select the wrench icon next to an integration to view available options.
The options shown depend on your access level. From the integration overview, you can create a new integration, update an existing one, or configure writeback, native transform, and OAuth.
## Create a BigQuery Integration
Begin on the **Domo on BigQuery** page (see [Open the Domo on BigQuery Page](#open-the-domo-on-bigquery-page)).
1. Enter a name to identify this BigQuery integration in Domo.
The name does not need to match anything in BigQuery and can be changed later.
2. (Optional) Enter a short description to help others understand the purpose of this integration.
This description is visible only in the integration details.
3. Select an existing service account from **BigQuery Service Account**, or select **Add Account** to create a new one.
This account authenticates with BigQuery and determines access to tables. To create a service account, see [Create a BigQuery Account](#create-a-bigquery-account).
**Important:** Changing the service account later may require remapping DataSets or Magic ETL DataFlows if access permissions differ.
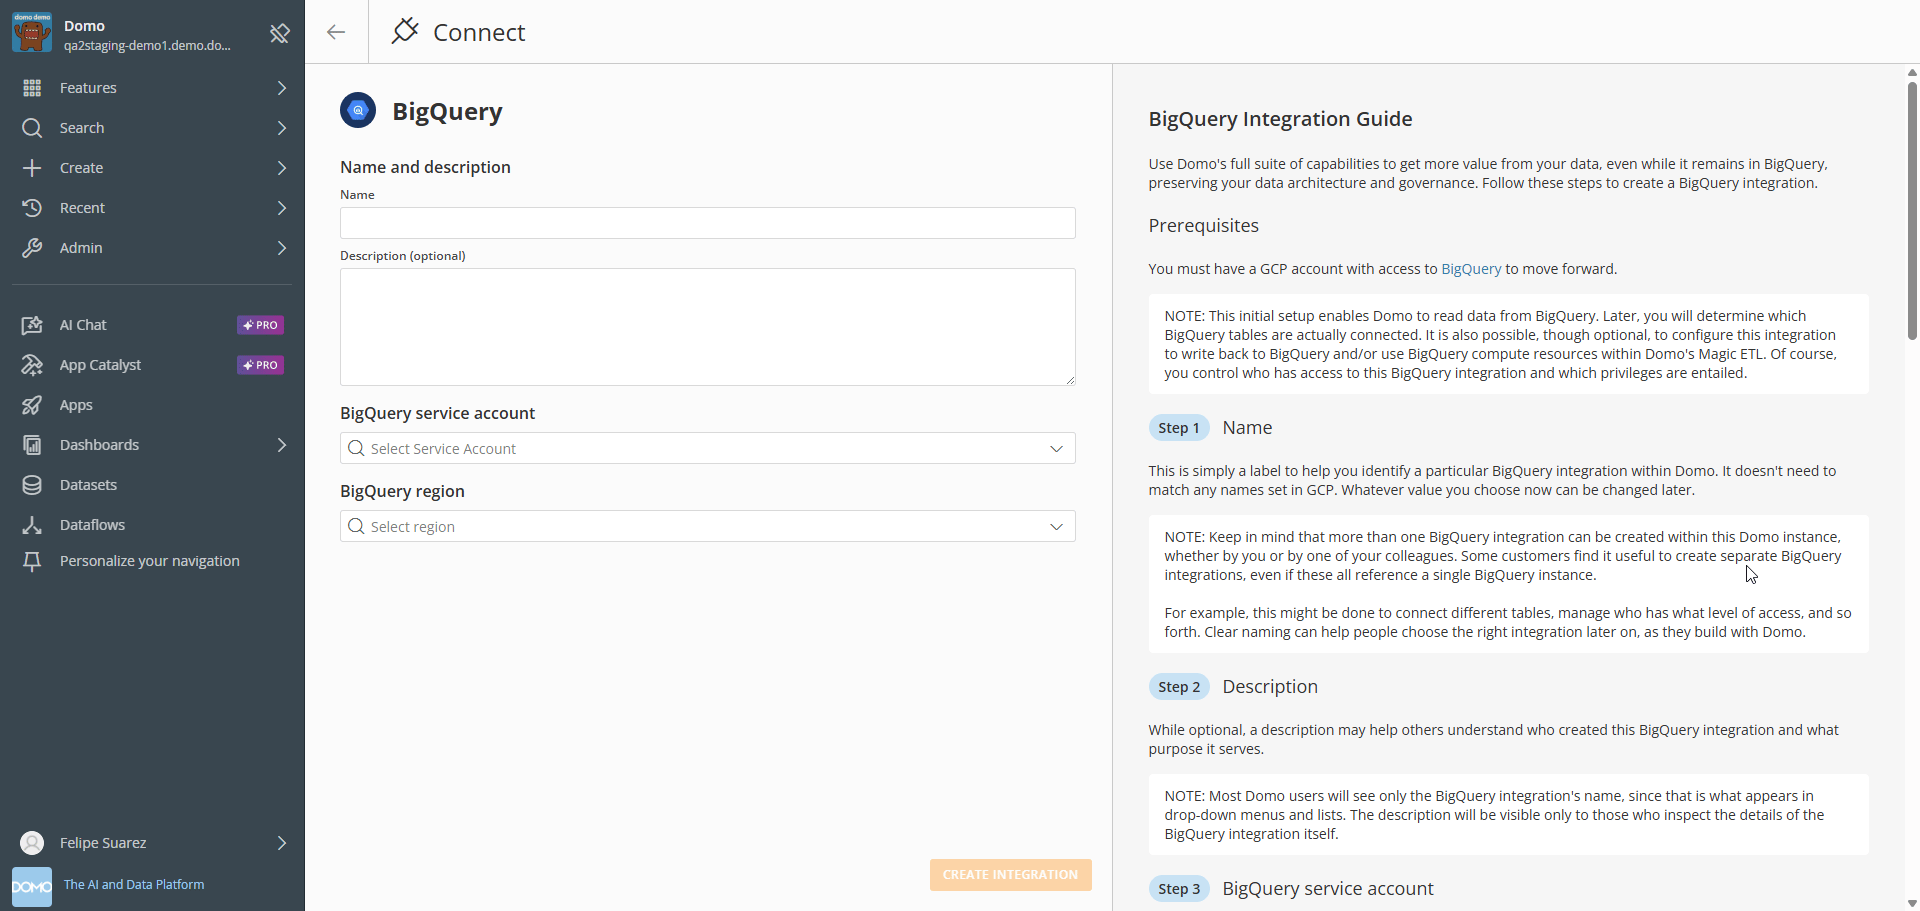 4. Select your **BigQuery Region**.
5. Select **Save Integration**.
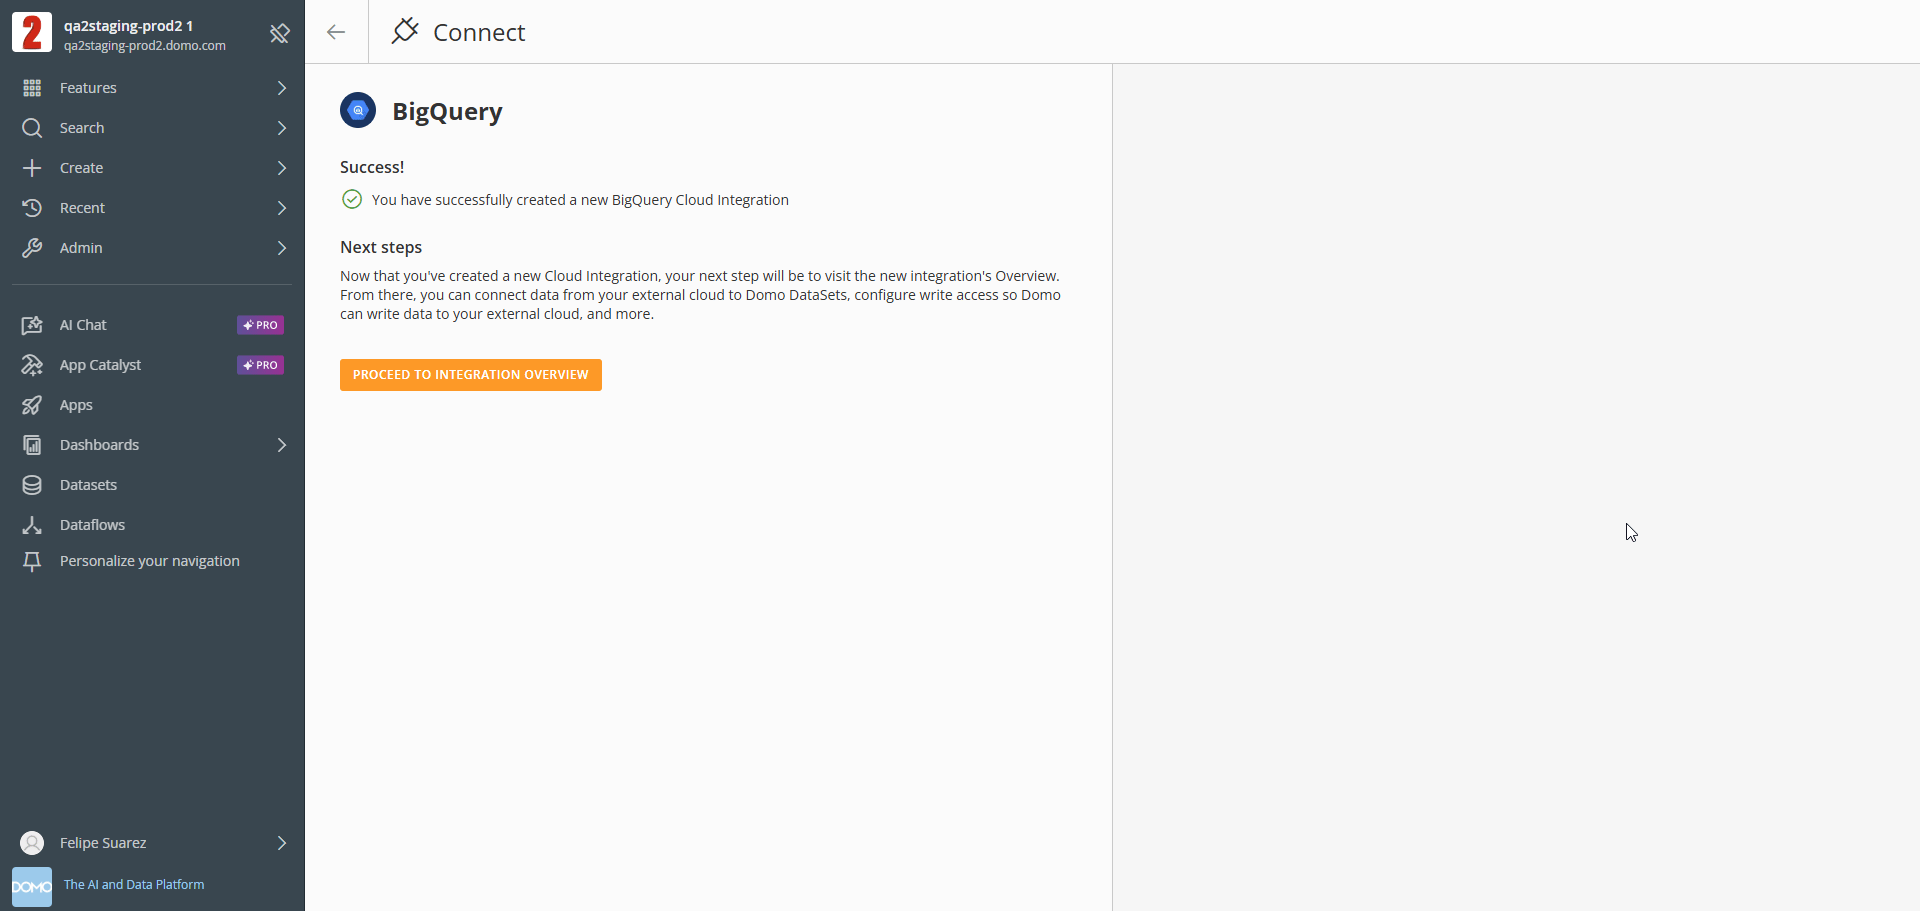
A confirmation screen appears when the integration is created successfully.
6. Select **Proceed to Integration Overview**.
The integration opens.
4. Select your **BigQuery Region**.
5. Select **Save Integration**.
A confirmation screen appears when the integration is created successfully.
6. Select **Proceed to Integration Overview**.
The integration opens.
 ## Create a BigQuery Account
Every BigQuery integration in Domo requires an authenticated BigQuery service account. Once created, a single service account can be reused across multiple integrations.
Begin in the BigQuery service account creation flow in Domo. Choose one of the following authentication methods.
## Create a BigQuery Account
Every BigQuery integration in Domo requires an authenticated BigQuery service account. Once created, a single service account can be reused across multiple integrations.
Begin in the BigQuery service account creation flow in Domo. Choose one of the following authentication methods.
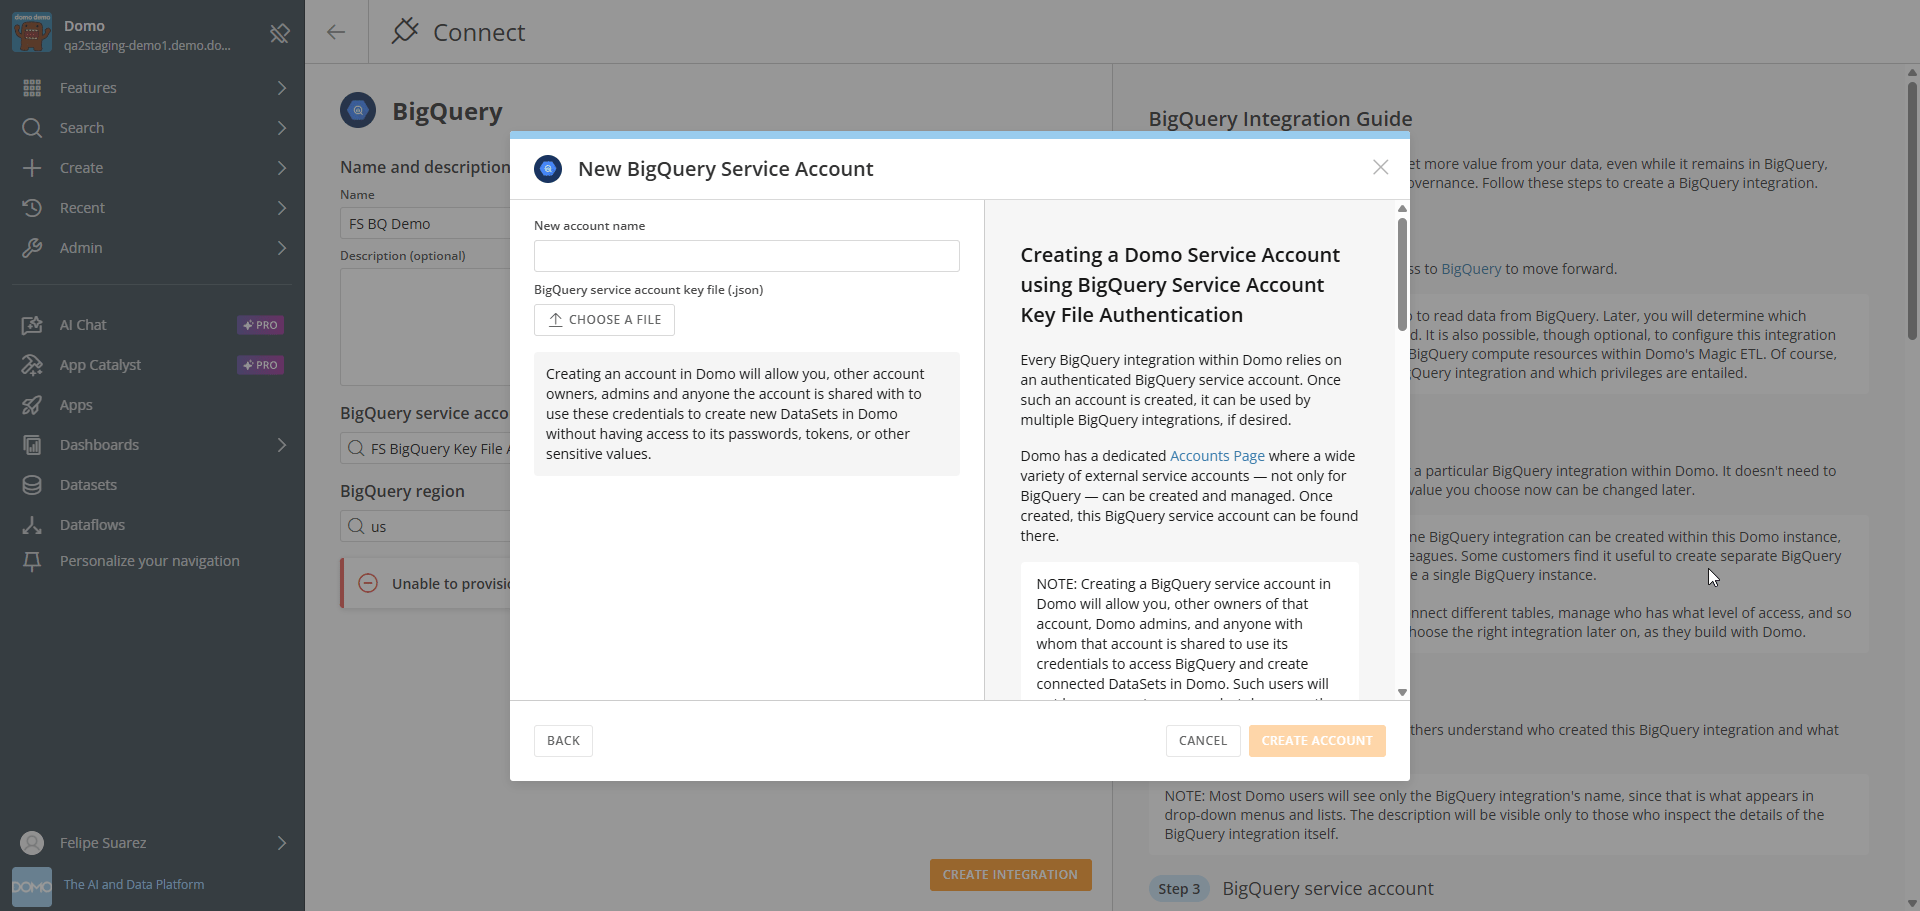
 ### Option 1: Use a BigQuery Service Account Key File
1. Enter a name to identify the BigQuery service account in Domo.
The name can be changed later.
**Tip:** Use a clear, distinct name to differentiate between multiple service accounts and integrations.
2. Upload the JSON key file you downloaded from the Google Cloud Console.
### Option 1: Use a BigQuery Service Account Key File
1. Enter a name to identify the BigQuery service account in Domo.
The name can be changed later.
**Tip:** Use a clear, distinct name to differentiate between multiple service accounts and integrations.
2. Upload the JSON key file you downloaded from the Google Cloud Console.
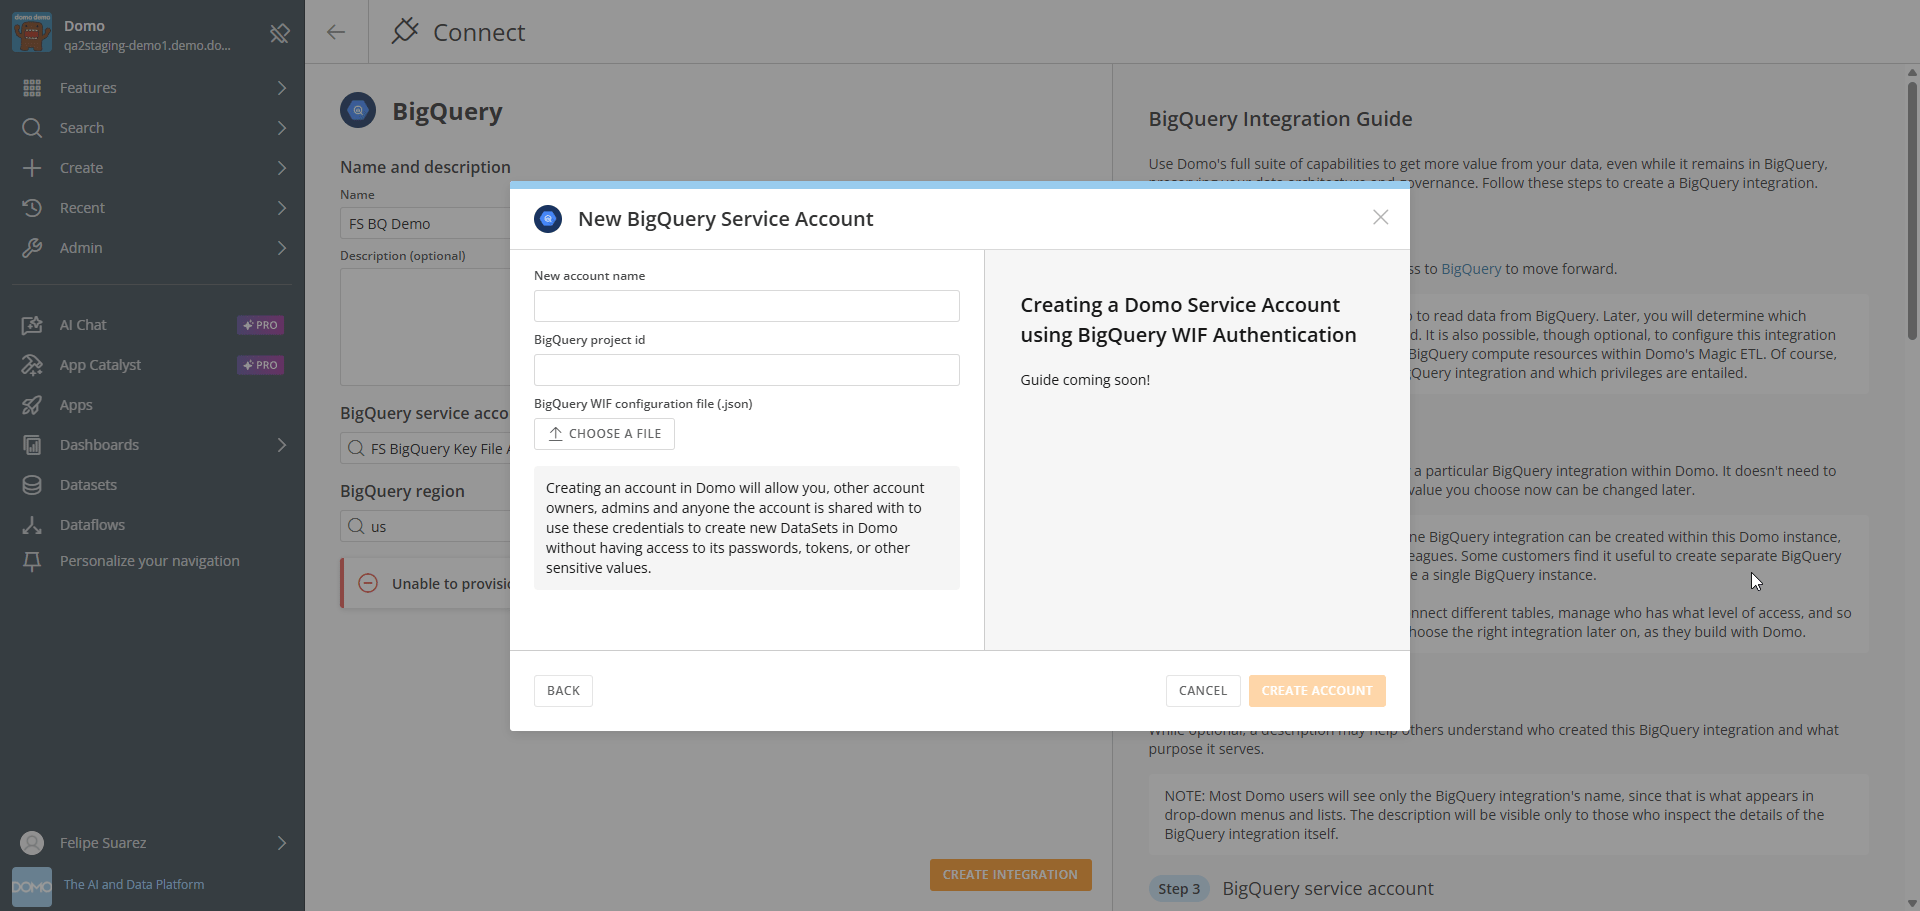
 ### Option 2: Use Workload Identity Federation (WIF)
1. Enter a name to identify the BigQuery service account in Domo.
The name can be changed later.
2. Enter the **Project ID** where you created your service account.
3. Upload the JSON configuration file you downloaded from the Google Cloud Console.
### Option 2: Use Workload Identity Federation (WIF)
1. Enter a name to identify the BigQuery service account in Domo.
The name can be changed later.
2. Enter the **Project ID** where you created your service account.
3. Upload the JSON configuration file you downloaded from the Google Cloud Console.
 ## Enable BigQuery Writeback
Writeback allows Domo to create and update tables in your BigQuery instance using the associated service account. Enable it when you want to use BigQuery as an output for Magic ETL DataFlows.
**Note:** If you only need to read BigQuery data, skip this section.
Even when writeback is enabled, access must be explicitly granted to individuals or groups. Basic access does not automatically include writeback privileges. You can manage access levels on the **Accounts** page by selecting **Account Sharing** next to the relevant BigQuery service account.
To configure writeback, begin on the integration's **Settings** page.
1. Navigate to **Data Warehouse** > **Connect Data** > **BigQuery**, select **Manage Integrations**, then select the wrench icon next to your integration.
The **Settings** page appears.
## Enable BigQuery Writeback
Writeback allows Domo to create and update tables in your BigQuery instance using the associated service account. Enable it when you want to use BigQuery as an output for Magic ETL DataFlows.
**Note:** If you only need to read BigQuery data, skip this section.
Even when writeback is enabled, access must be explicitly granted to individuals or groups. Basic access does not automatically include writeback privileges. You can manage access levels on the **Accounts** page by selecting **Account Sharing** next to the relevant BigQuery service account.
To configure writeback, begin on the integration's **Settings** page.
1. Navigate to **Data Warehouse** > **Connect Data** > **BigQuery**, select **Manage Integrations**, then select the wrench icon next to your integration.
The **Settings** page appears.
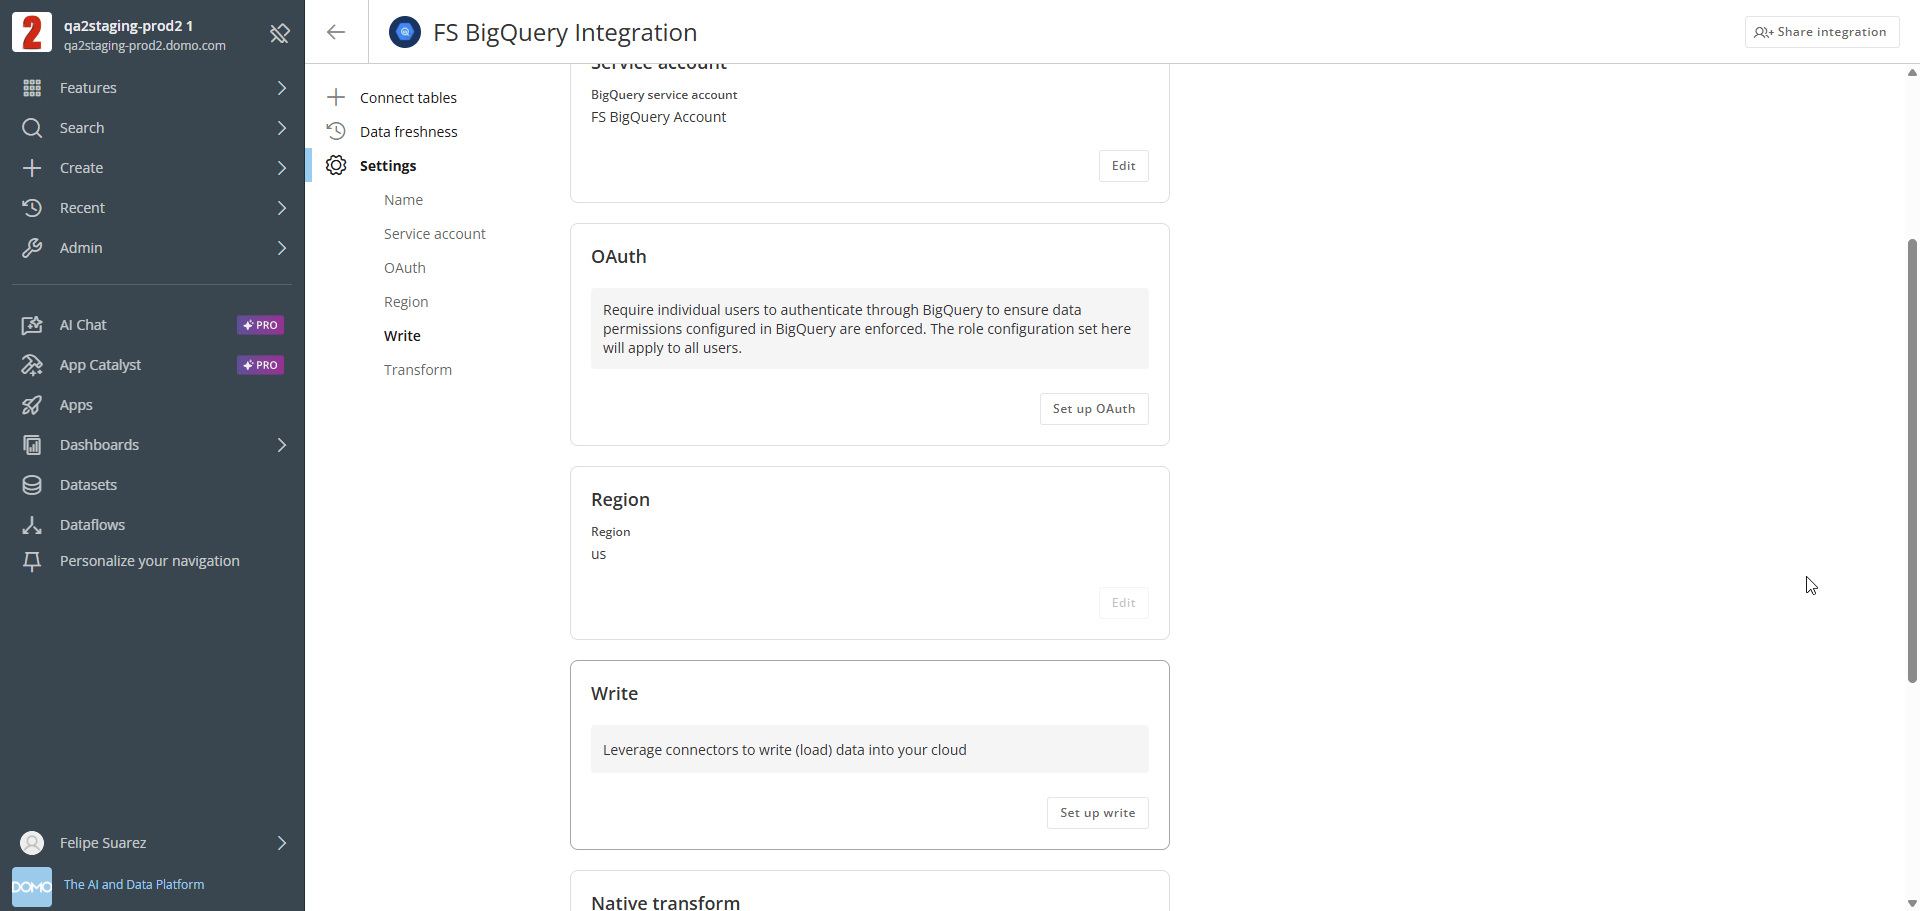 2. In the **Write** section, select **Set up write**.
The **Configure Write Access** dialog appears.
3. Select the BigQuery project to use for writing data from Domo.
4. Select the default dataset for data output.
2. In the **Write** section, select **Set up write**.
The **Configure Write Access** dialog appears.
3. Select the BigQuery project to use for writing data from Domo.
4. Select the default dataset for data output.
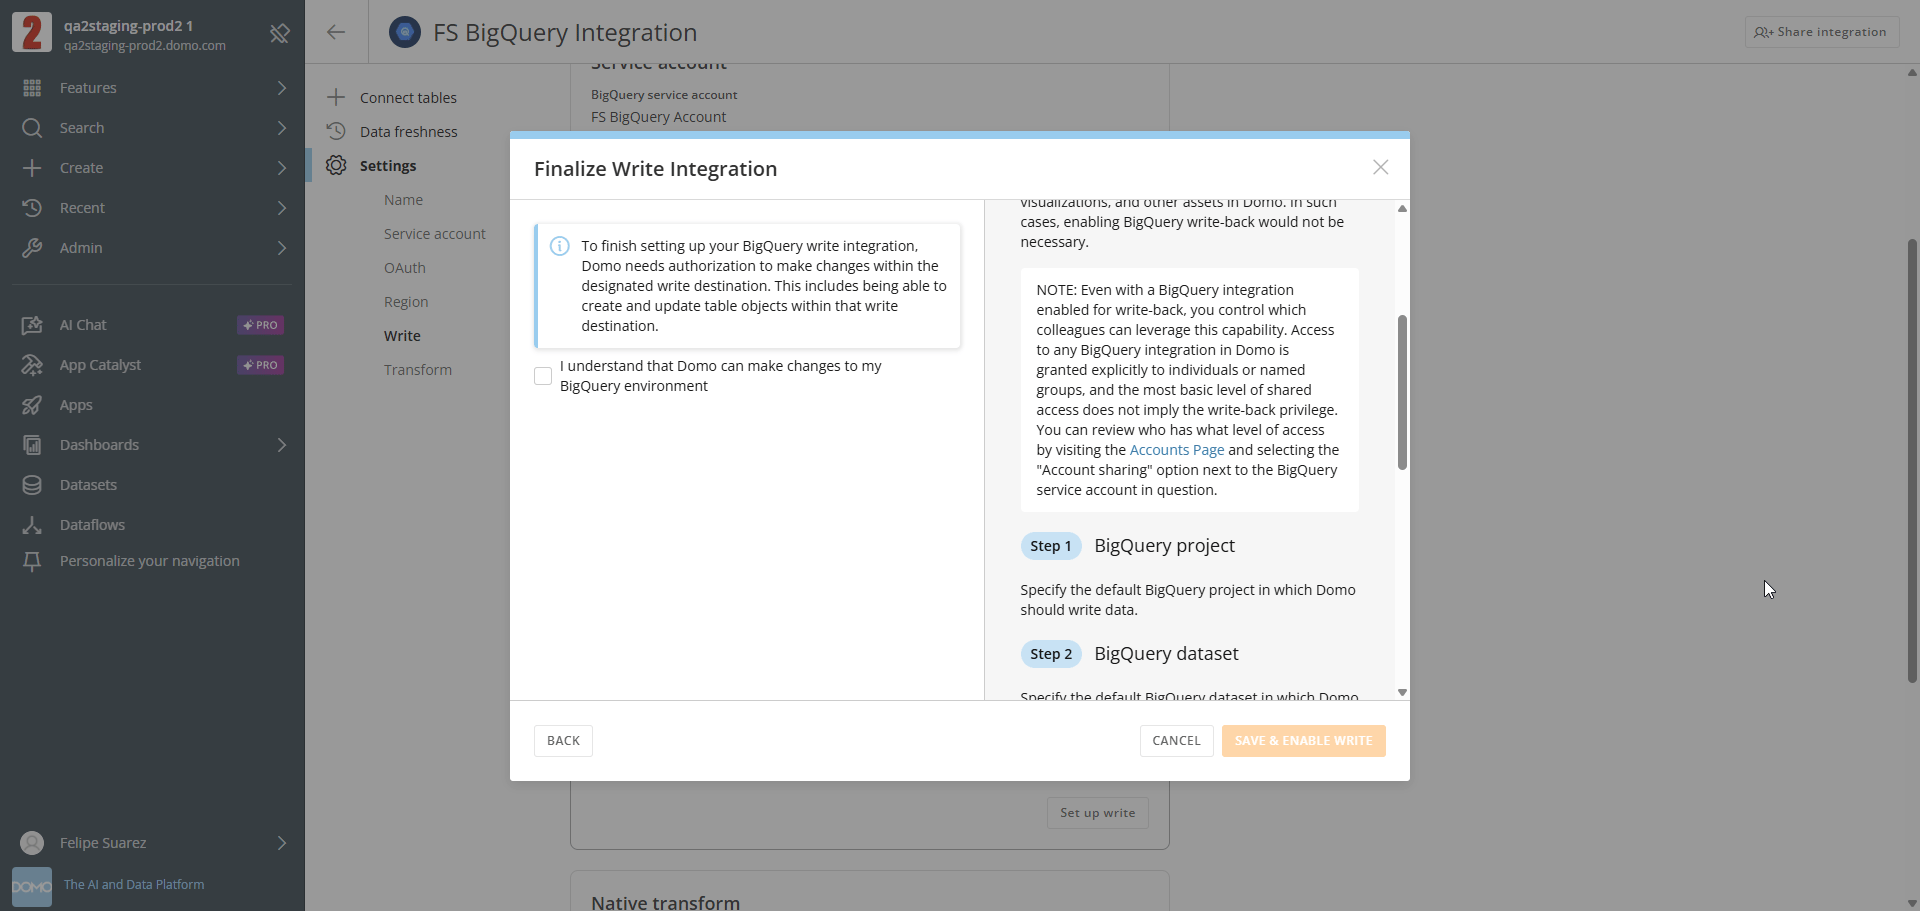
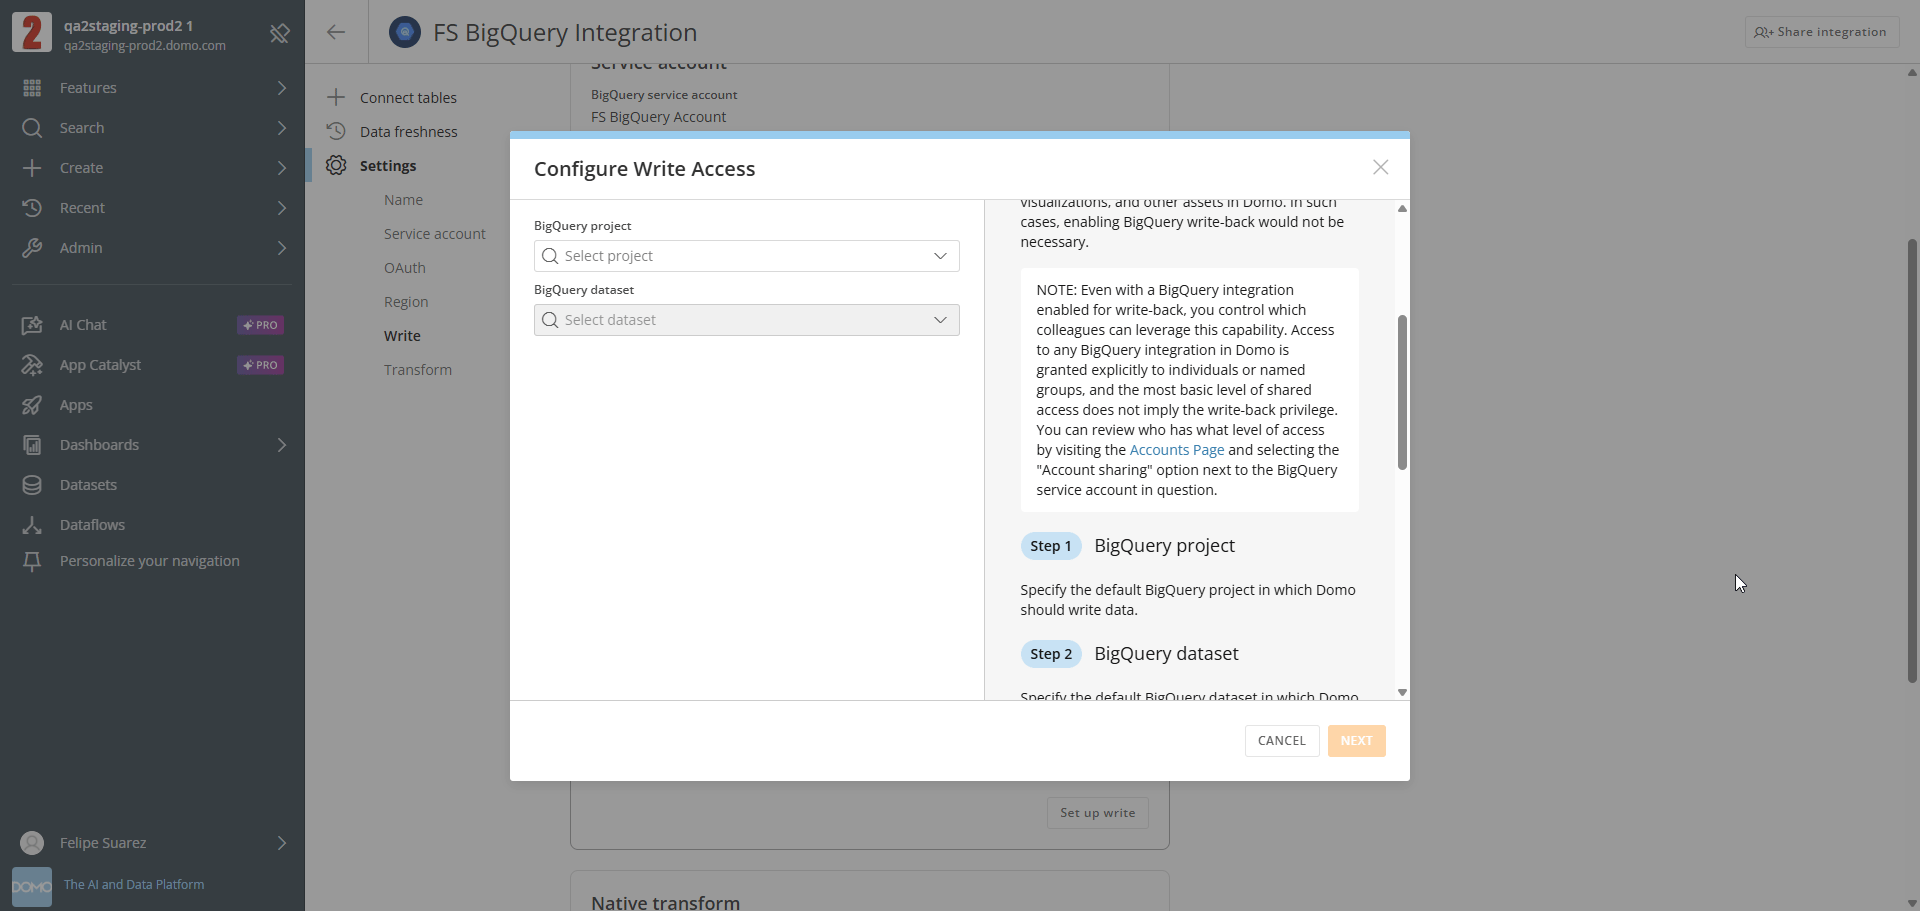 5. Select the authorization checkbox to confirm that Domo is authorized to create, modify, and delete objects in BigQuery using the service account.
6. Select **Save & Enable Write**.
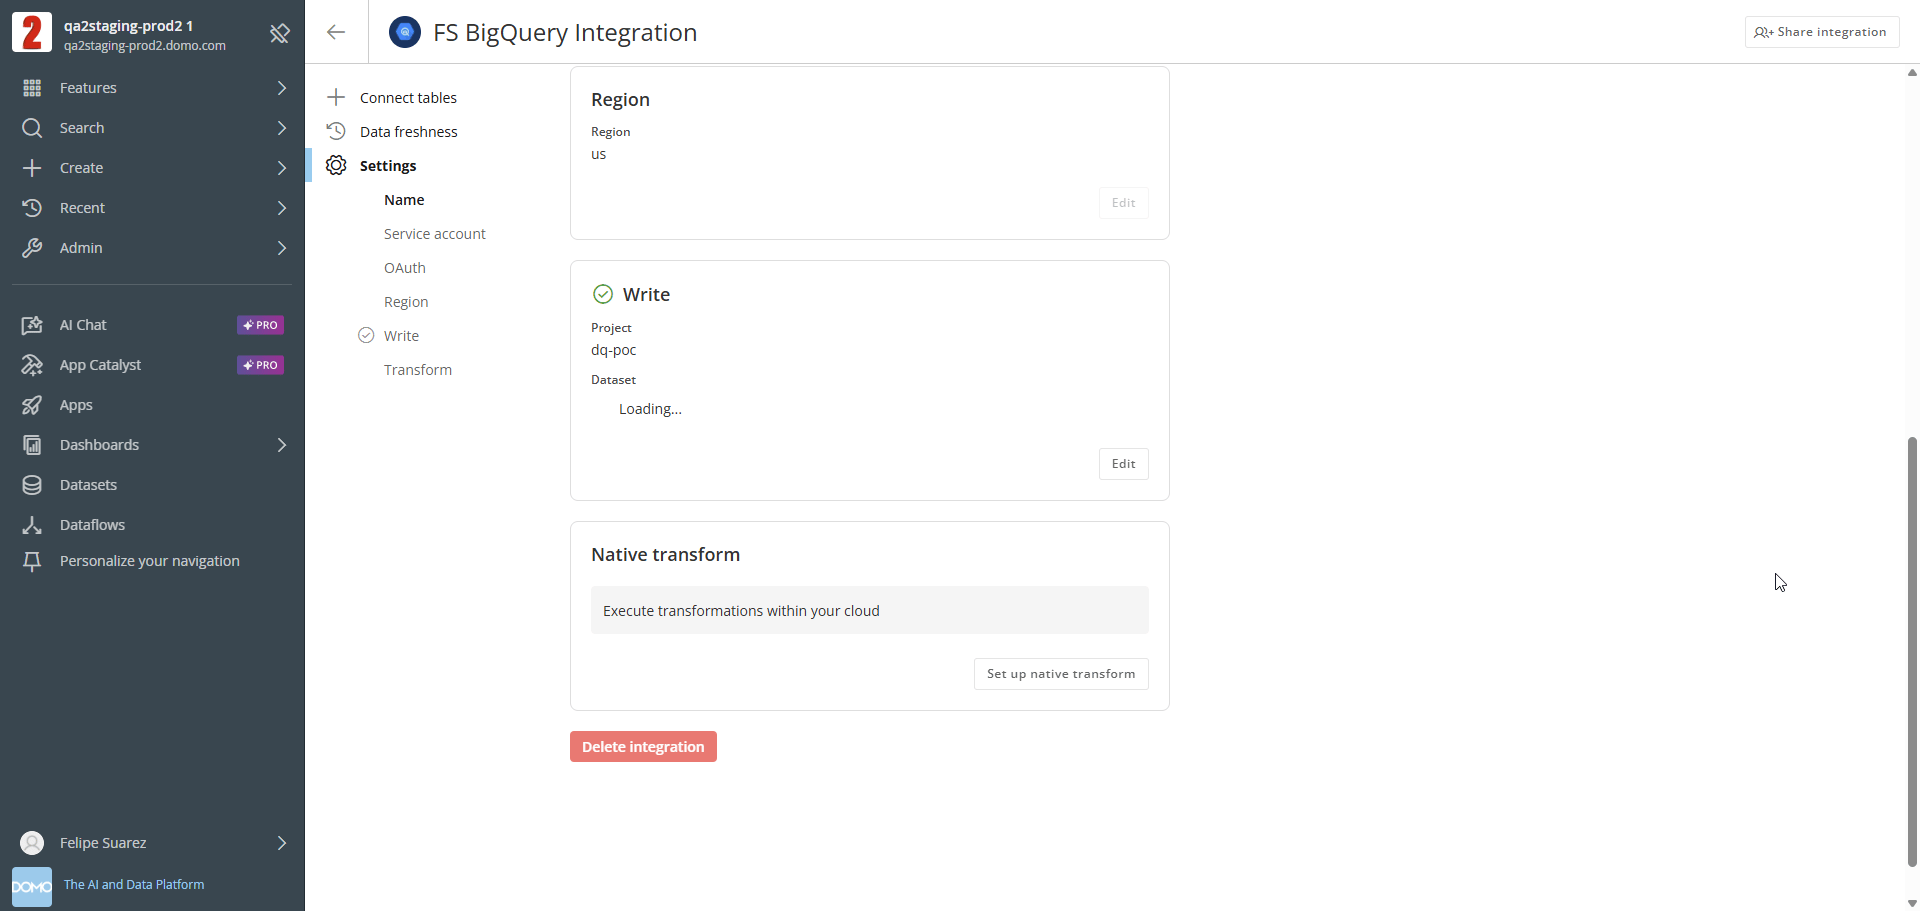
The **Write** section on the **Settings** page displays the configured project and dataset with a green checkmark.
5. Select the authorization checkbox to confirm that Domo is authorized to create, modify, and delete objects in BigQuery using the service account.
6. Select **Save & Enable Write**.
The **Write** section on the **Settings** page displays the configured project and dataset with a green checkmark.
 ## Enable Native Transform
Native transform is optional. Without it, Domo uses its own compute resources to read and write BigQuery data. When enabled for an integration, anyone who shares that integration can choose BigQuery compute for individual Magic ETL DataFlows. This is a per-pipeline selection, not a global setting.
**Note:** The project and dataset values for native transform are shared with the writeback configuration. Changing them in one place changes both.
To configure native transform, begin on the integration's **Settings** page (see [Enable BigQuery Writeback](#enable-bigquery-writeback) for navigation steps).
1. In the **Native transform** section, select **Set up native transform**.
The **Configure Native Transform** dialog appears.
2. Select the BigQuery project for native transform.
3. Select the default BigQuery dataset.
## Enable Native Transform
Native transform is optional. Without it, Domo uses its own compute resources to read and write BigQuery data. When enabled for an integration, anyone who shares that integration can choose BigQuery compute for individual Magic ETL DataFlows. This is a per-pipeline selection, not a global setting.
**Note:** The project and dataset values for native transform are shared with the writeback configuration. Changing them in one place changes both.
To configure native transform, begin on the integration's **Settings** page (see [Enable BigQuery Writeback](#enable-bigquery-writeback) for navigation steps).
1. In the **Native transform** section, select **Set up native transform**.
The **Configure Native Transform** dialog appears.
2. Select the BigQuery project for native transform.
3. Select the default BigQuery dataset.
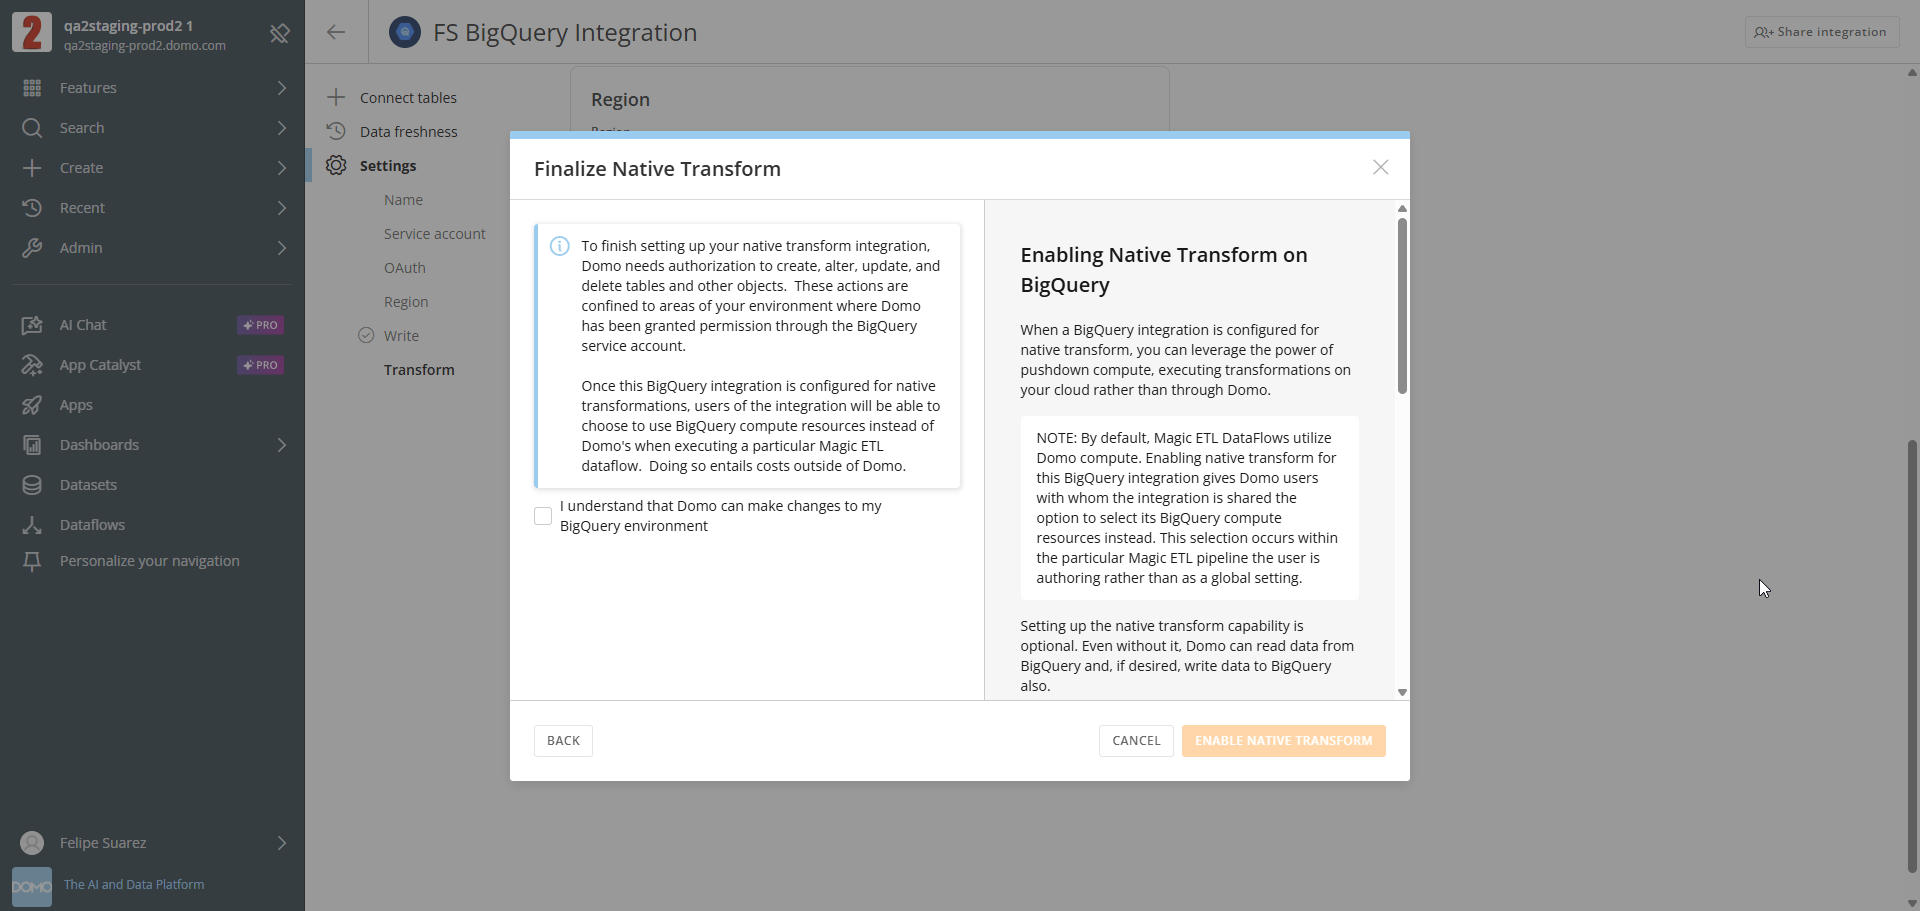
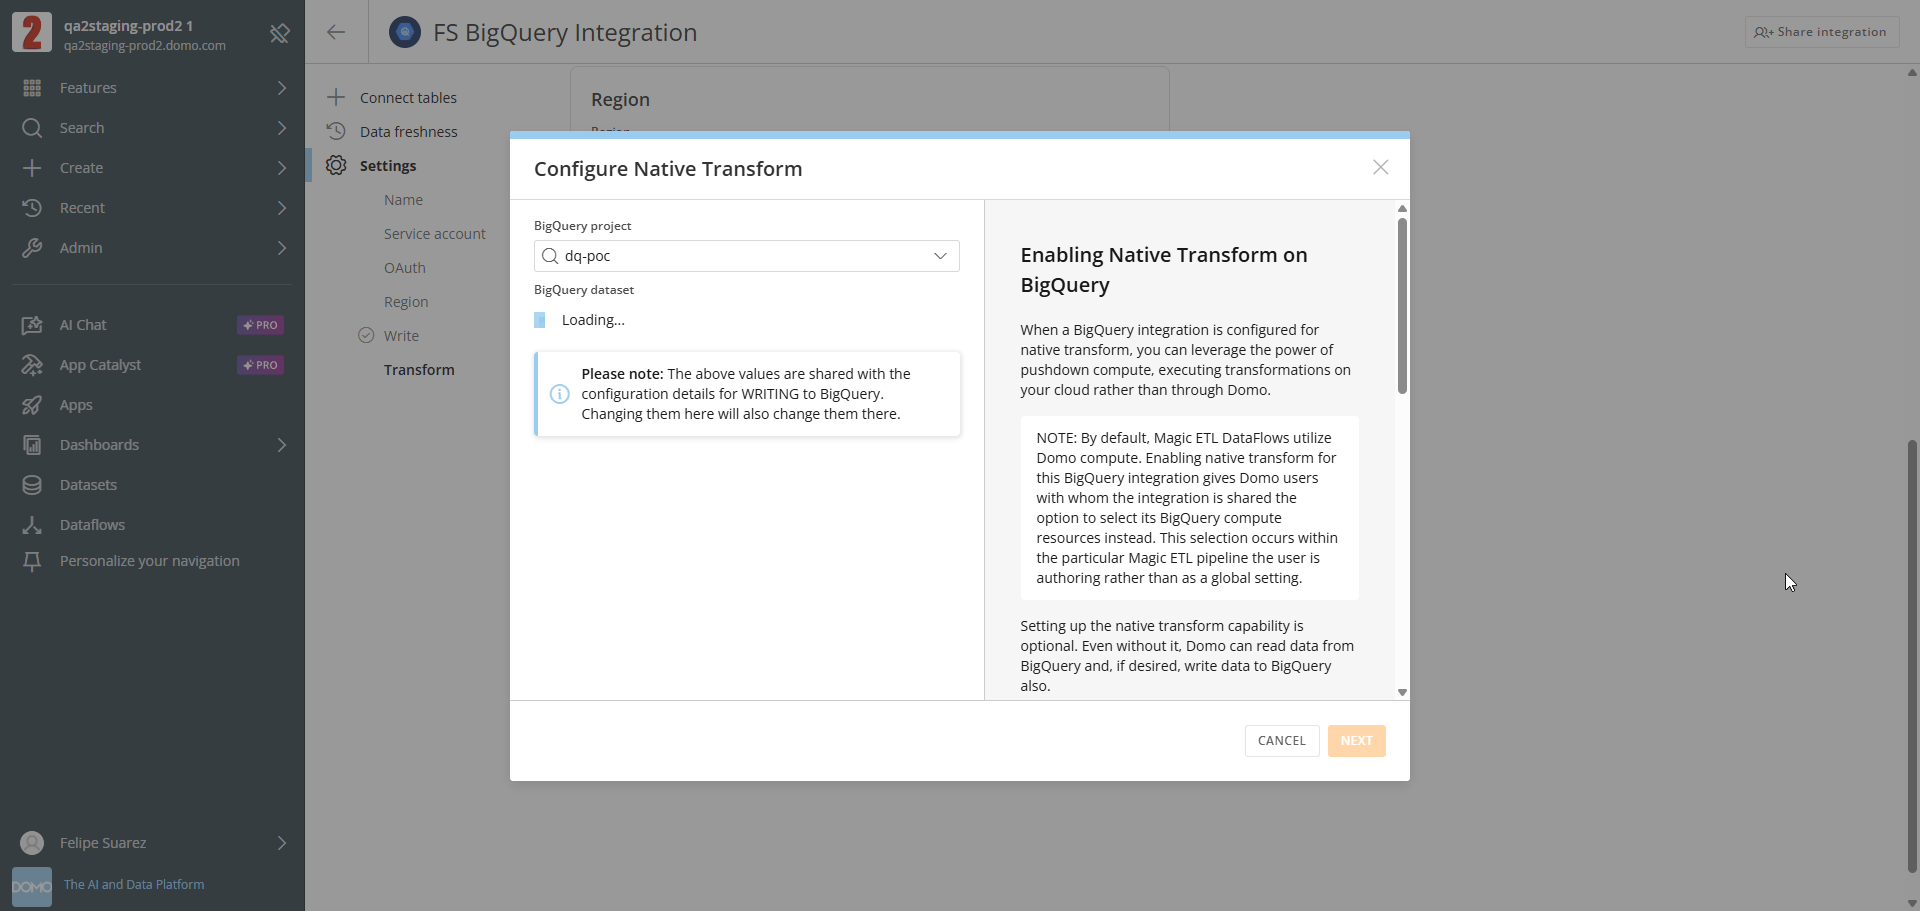 4. Select the authorization checkbox to confirm that Domo is authorized to create, alter, update, and delete objects in your BigQuery environment.
5. Select **Save & Enable Native Transform**.
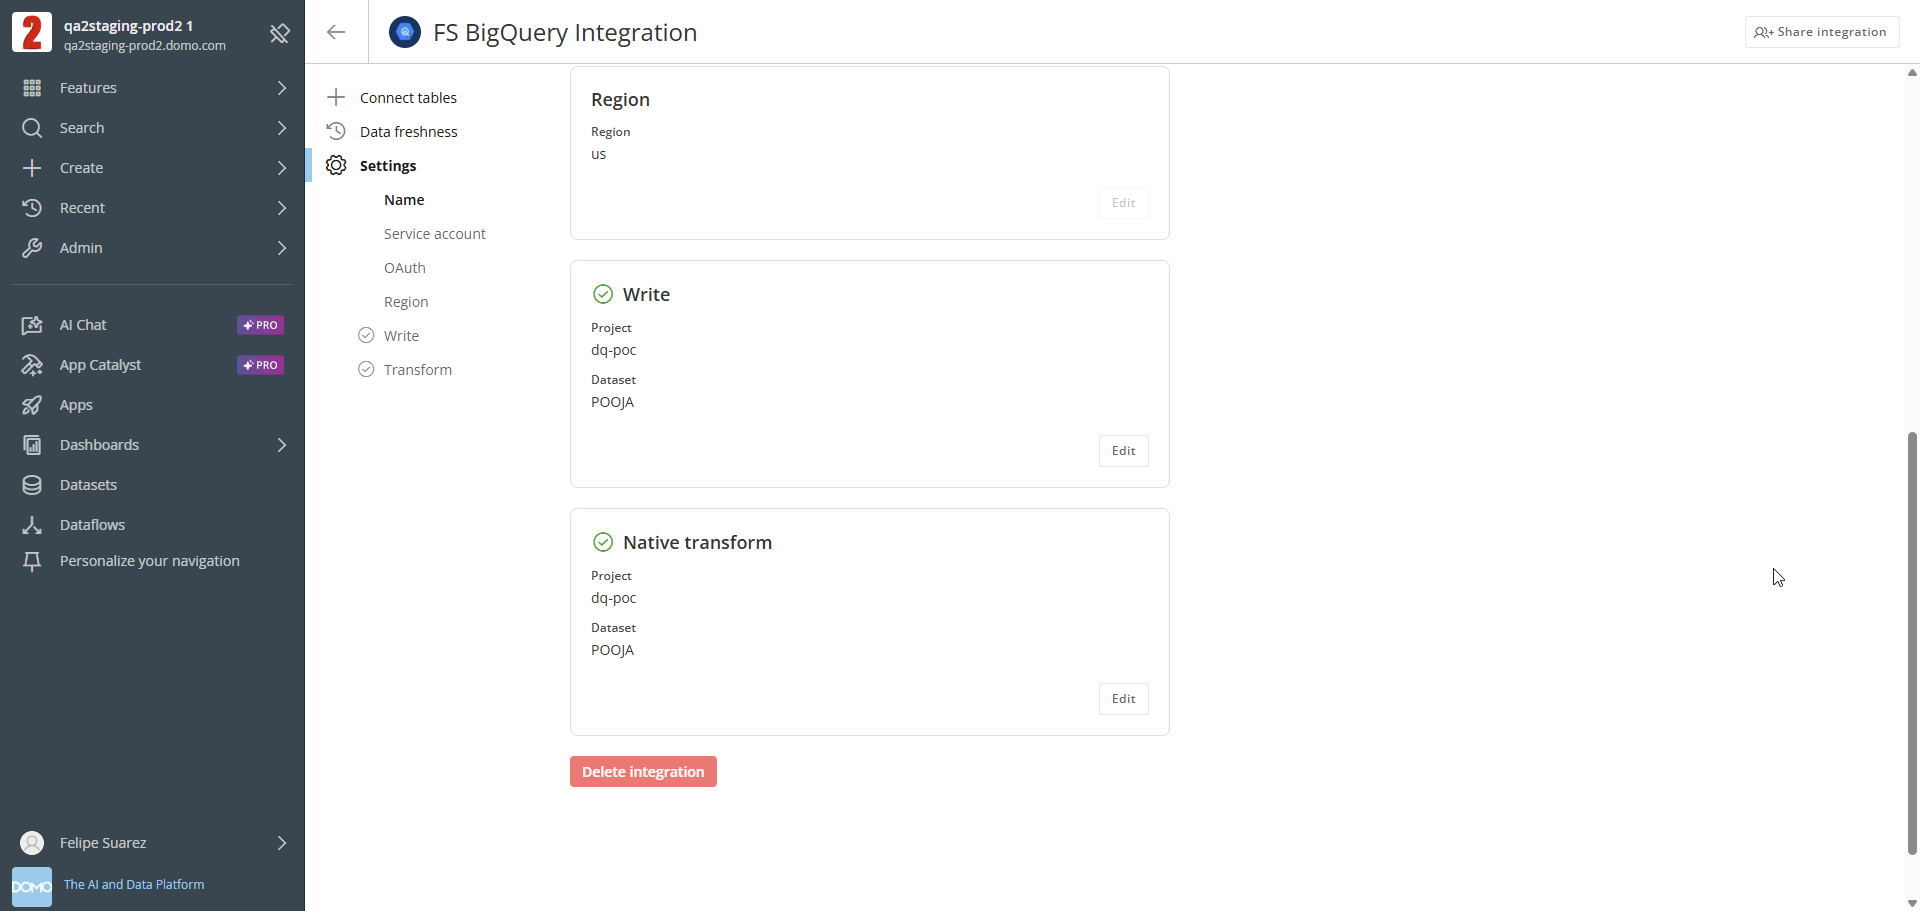
The **Native transform** section on the **Settings** page displays the configured project and dataset with a green checkmark.
4. Select the authorization checkbox to confirm that Domo is authorized to create, alter, update, and delete objects in your BigQuery environment.
5. Select **Save & Enable Native Transform**.
The **Native transform** section on the **Settings** page displays the configured project and dataset with a green checkmark.
 ## Configure OAuth
When OAuth is enabled for a cloud integration, all DataSets connected through that integration use OAuth authentication. When you view a card or preview a DataSet built with an OAuth-enabled integration, Domo prompts you to enter your Google Cloud Platform (GCP) credentials. Domo then queries BigQuery data in the context of your account, rather than the BigQuery service account.
**Note:** Currently, Domo enforces OAuth for reading data from BigQuery. This applies to individuals viewing connected DataSets and derived assets such as cards and dashboards. OAuth does not apply to Magic ETL, writeback, or native transforms. These operations use the BigQuery service account instead of an individual GCP account.
OAuth configuration is optional. Even without OAuth, Domo can connect to BigQuery to read data, use BigQuery compute, and write data back to BigQuery (if writeback is enabled).
To configure OAuth, begin on the integration's **Settings** page (see [Enable BigQuery Writeback](#enable-bigquery-writeback) for navigation steps).
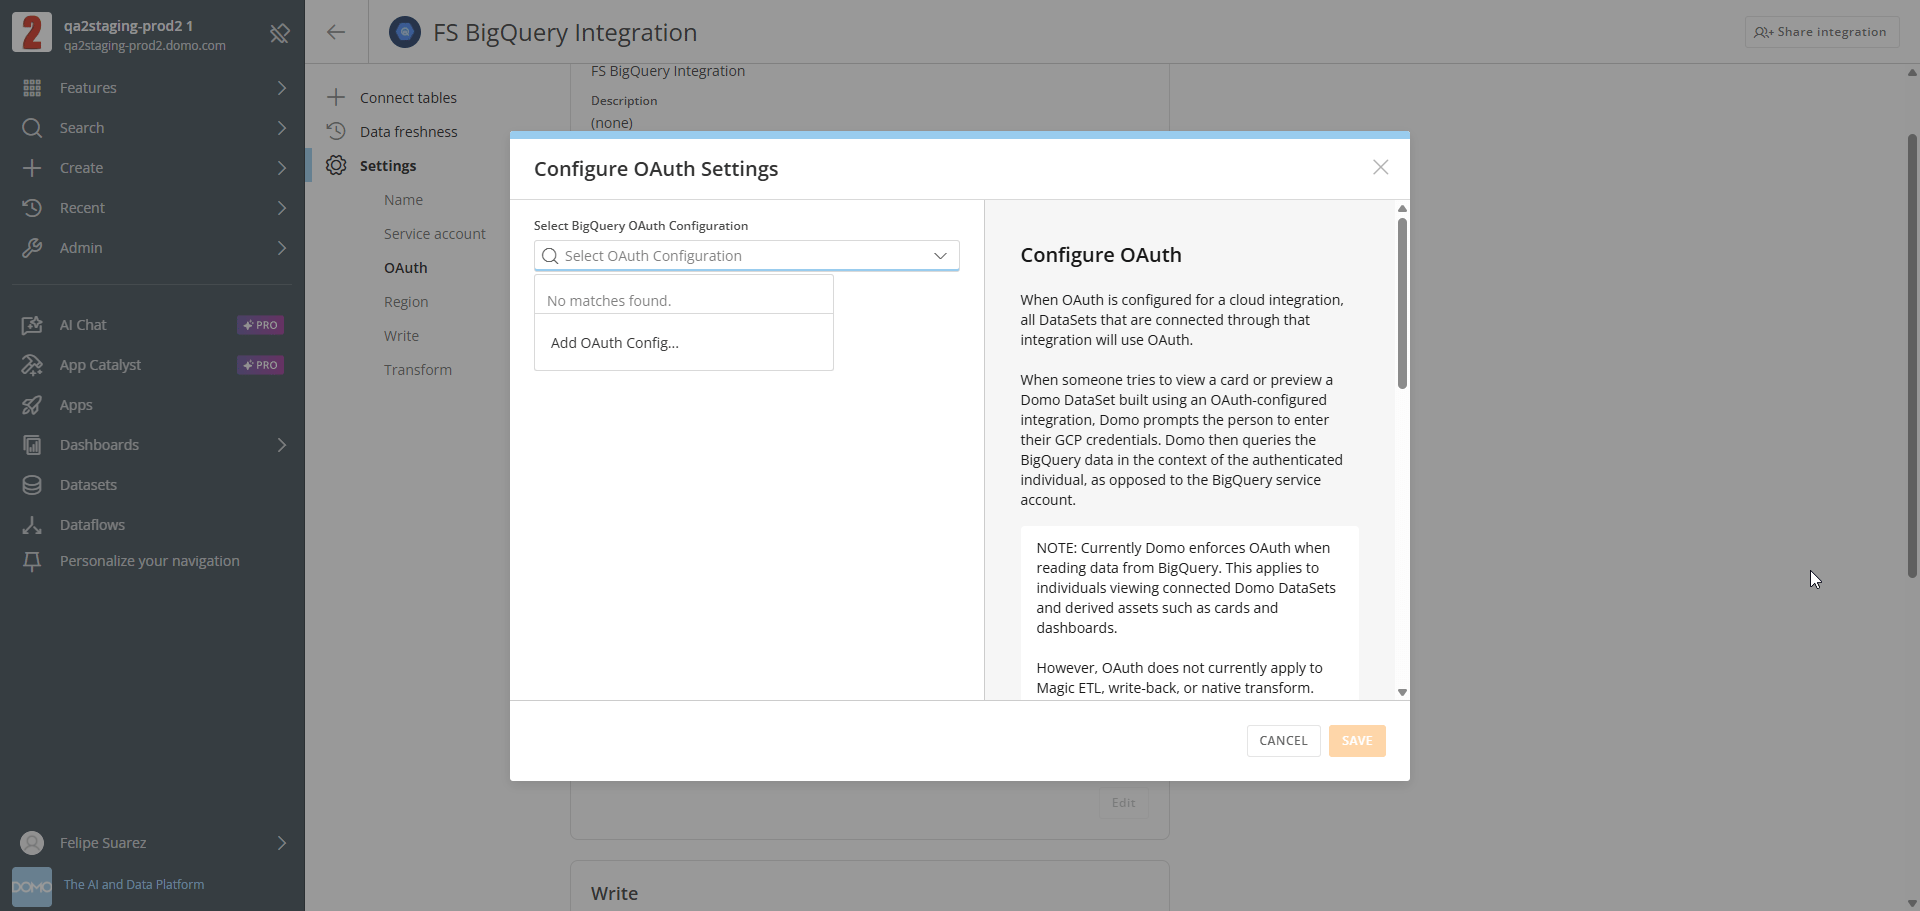
1. In the **OAuth** section, select **Set up OAuth**.
The **Configure OAuth Settings** dialog appears.
2. Select an existing configuration from the **BigQuery OAuth Configuration** dropdown, or select **Add OAuth Config...** to create a new one.
## Configure OAuth
When OAuth is enabled for a cloud integration, all DataSets connected through that integration use OAuth authentication. When you view a card or preview a DataSet built with an OAuth-enabled integration, Domo prompts you to enter your Google Cloud Platform (GCP) credentials. Domo then queries BigQuery data in the context of your account, rather than the BigQuery service account.
**Note:** Currently, Domo enforces OAuth for reading data from BigQuery. This applies to individuals viewing connected DataSets and derived assets such as cards and dashboards. OAuth does not apply to Magic ETL, writeback, or native transforms. These operations use the BigQuery service account instead of an individual GCP account.
OAuth configuration is optional. Even without OAuth, Domo can connect to BigQuery to read data, use BigQuery compute, and write data back to BigQuery (if writeback is enabled).
To configure OAuth, begin on the integration's **Settings** page (see [Enable BigQuery Writeback](#enable-bigquery-writeback) for navigation steps).
1. In the **OAuth** section, select **Set up OAuth**.
The **Configure OAuth Settings** dialog appears.
2. Select an existing configuration from the **BigQuery OAuth Configuration** dropdown, or select **Add OAuth Config...** to create a new one.
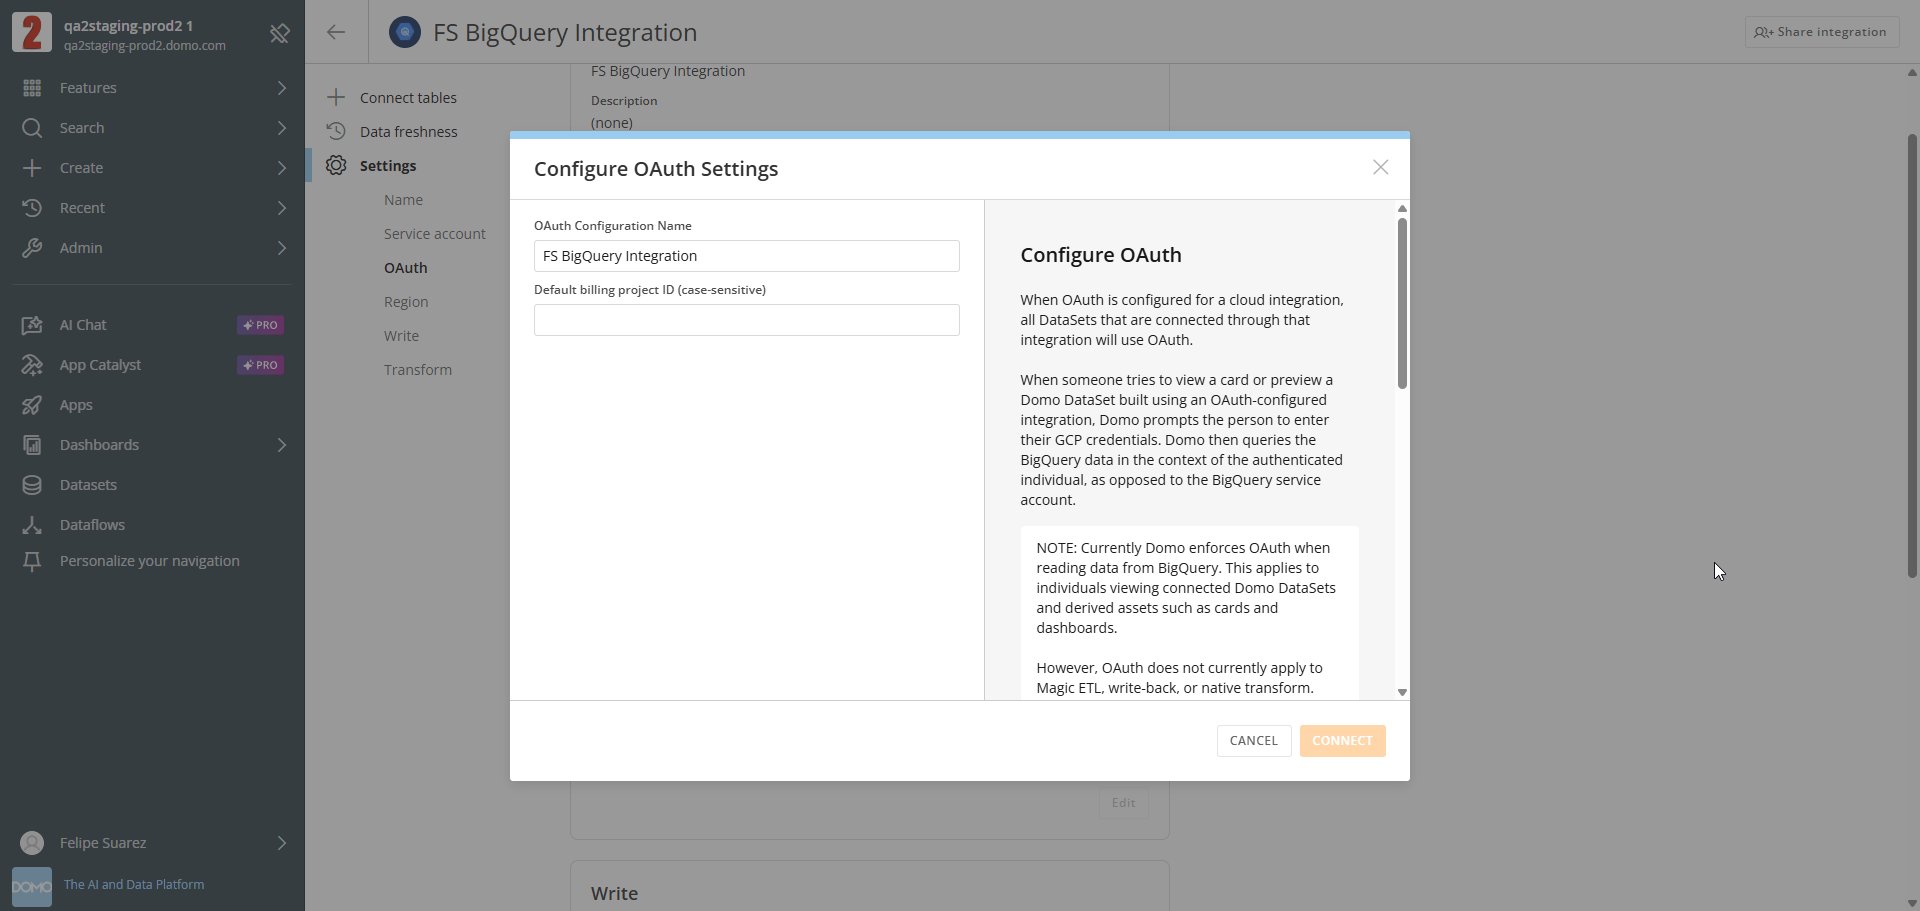
 3. (Conditional) For new configurations only, enter an **OAuth Configuration Name** and the **Default billing project ID**.
This is the GCP project whose billing account will be charged for query usage.
**Note:** Enter the Project ID exactly as it appears in GCP, including case sensitivity.
3. (Conditional) For new configurations only, enter an **OAuth Configuration Name** and the **Default billing project ID**.
This is the GCP project whose billing account will be charged for query usage.
**Note:** Enter the Project ID exactly as it appears in GCP, including case sensitivity.
 4. Select **Connect**.
A Google sign-in window appears.
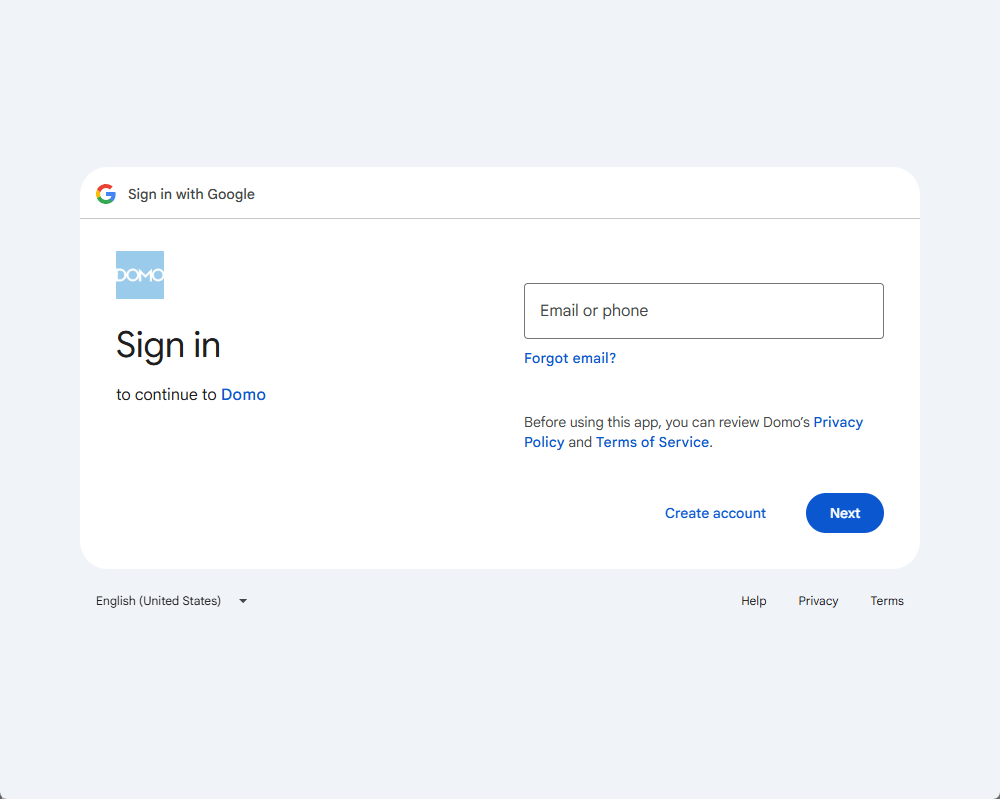
4. Select **Connect**.
A Google sign-in window appears.
 5. Select your GCP account and sign in.
6. Select **Save** to apply the OAuth configuration.
## Review Query Metadata
Domo provides additional metadata fields for queries executed through BigQuery integrations. These fields help you track and audit query context. They are visible in BigQuery's job history under the job labels.
The following metadata fields are available:
| Field | Value |
| ---------------- | ----------------------------------------------------------- |
| `application` | `"ice"` (Domo's internal identifier for Cloud Integrations) |
| `customer` | Customer name |
| `connection` | BigQuery integration name |
| `dataset` | BigQuery integration dataset name |
| `data_source_id` | DataSource ID |
| `card_id` | DataSource card ID |
## Connect Tables to DataSets
After setting up your BigQuery integration, you can connect BigQuery tables to Domo DataSets using the **Connect Tables** section in the integration overview. Learn more about [connecting tables to Domo](/s/article/Connect-Tables-in-Cloud-Integrations).
## FAQ
No, spaces are not allowed in table names.
5. Select your GCP account and sign in.
6. Select **Save** to apply the OAuth configuration.
## Review Query Metadata
Domo provides additional metadata fields for queries executed through BigQuery integrations. These fields help you track and audit query context. They are visible in BigQuery's job history under the job labels.
The following metadata fields are available:
| Field | Value |
| ---------------- | ----------------------------------------------------------- |
| `application` | `"ice"` (Domo's internal identifier for Cloud Integrations) |
| `customer` | Customer name |
| `connection` | BigQuery integration name |
| `dataset` | BigQuery integration dataset name |
| `data_source_id` | DataSource ID |
| `card_id` | DataSource card ID |
## Connect Tables to DataSets
After setting up your BigQuery integration, you can connect BigQuery tables to Domo DataSets using the **Connect Tables** section in the integration overview. Learn more about [connecting tables to Domo](/s/article/Connect-Tables-in-Cloud-Integrations).
## FAQ
No, spaces are not allowed in table names.