> ## Documentation Index
> Fetch the complete documentation index at: https://domoinc-bradley-turek-pfilter-operators-reference.mintlify.site/llms.txt
> Use this file to discover all available pages before exploring further.
# Create and Use Data Models
**Note:** This feature is in beta. Beta Program participants can enable
features [here](https://embed.domo.com/embed/pages/DQ8Ek). To join the Beta
Program, fill out [this form](https://embed.domo.com/embed/pages/K8GMx). For beta questions or feedback, email
[beta.admin@domo.com](mailto:beta.admin@domo.com).
## Intro
This article explains how to create a Data Model, add DataSets to the canvas, define relationships between DataSets, configure schema metadata, and use a Data Model as a data source in Analyzer.
***
## Required Grants
To create and manage Data Models, you must have an **Editor** or **Admin** role, or a custom role with access to data tools. The DataSets you want to relate must already be available in your Domo instance.
## Create a Data Model
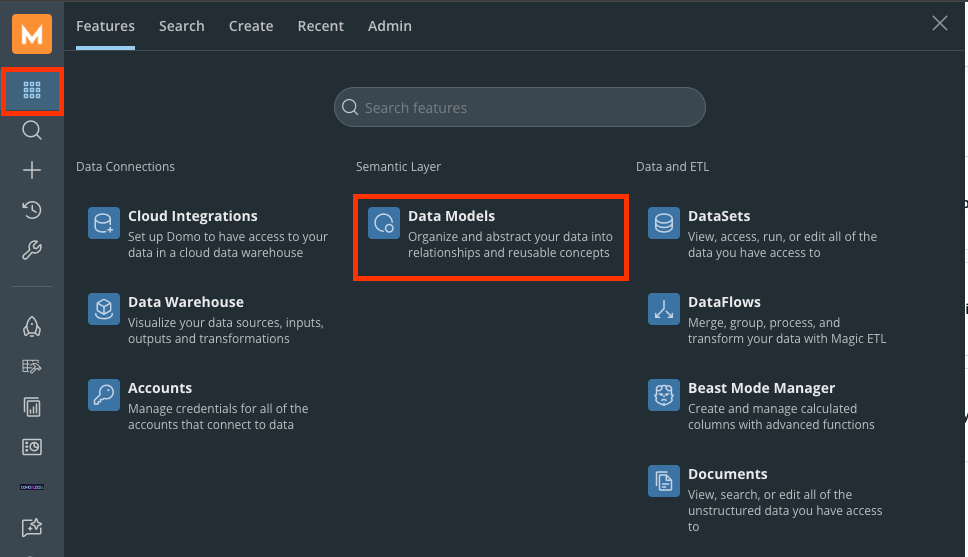
1. From the navigation menu, go to **Features** and select **Data Models** under **Semantic Layer**.
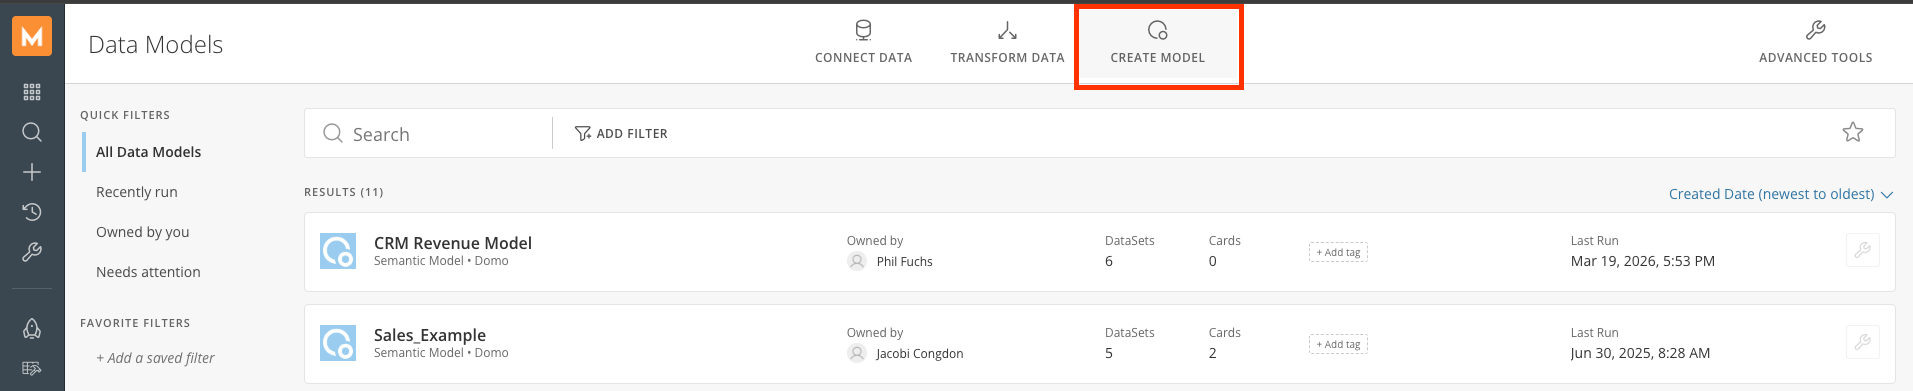
 2. Select **Create Model** in the top menu. A new model is created, and you are taken to the Data Model Editor canvas.
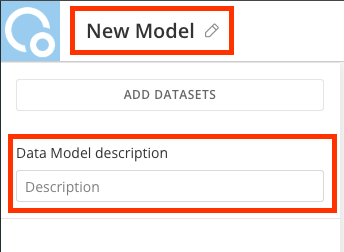
 3. Enter a **Name** and an optional **Description** for your model.
 **Tip:** You can also duplicate an existing model instead of starting from scratch. Open any model and select the duplicate option from the model menu to create a new version you can modify independently.
## Add DataSets to the Canvas
The Data Model Editor is a visual canvas where you add DataSets and define the relationships between them.
1. In the Editor, select **Add DataSet**.
**Tip:** You can also duplicate an existing model instead of starting from scratch. Open any model and select the duplicate option from the model menu to create a new version you can modify independently.
## Add DataSets to the Canvas
The Data Model Editor is a visual canvas where you add DataSets and define the relationships between them.
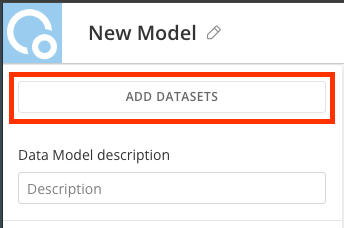
1. In the Editor, select **Add DataSet**.
 2. Search for and select the DataSet you want to include. You can add tables from the following sources:
* **Domo DataSets —** any DataSet already in your Domo instance.
* **Data Model outputs —** tables that are outputs of other Data Models.
* **Snowflake tables —** tables connected directly from Snowflake.
**Note:** All tables in a Data Model must come from the same warehouse. You cannot mix Domo DataSets and Snowflake tables within a single model.
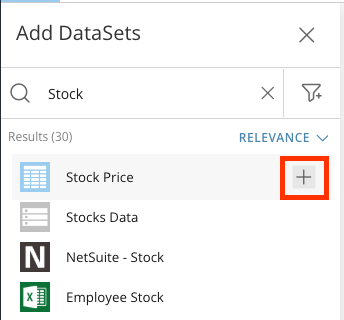
Select the **+** next to the DataSet name to add it to the canvas.
2. Search for and select the DataSet you want to include. You can add tables from the following sources:
* **Domo DataSets —** any DataSet already in your Domo instance.
* **Data Model outputs —** tables that are outputs of other Data Models.
* **Snowflake tables —** tables connected directly from Snowflake.
**Note:** All tables in a Data Model must come from the same warehouse. You cannot mix Domo DataSets and Snowflake tables within a single model.
Select the **+** next to the DataSet name to add it to the canvas.
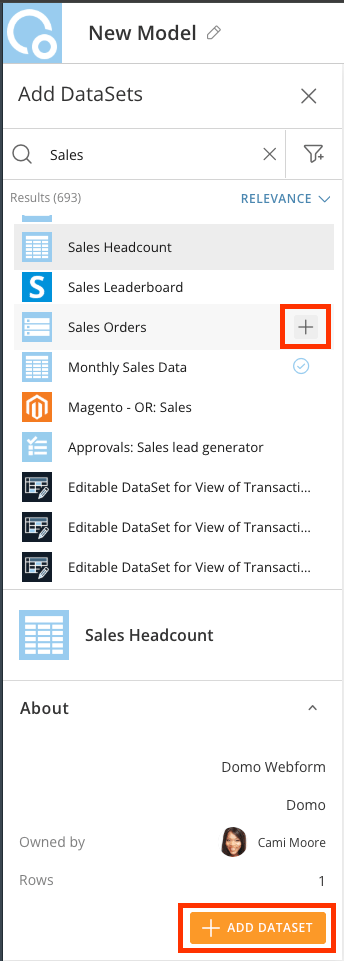
 You can also select a DataSet by selecting its name. A panel with the DataSet attributes appears. Select **+ Add DataSet** to add it to the canvas.
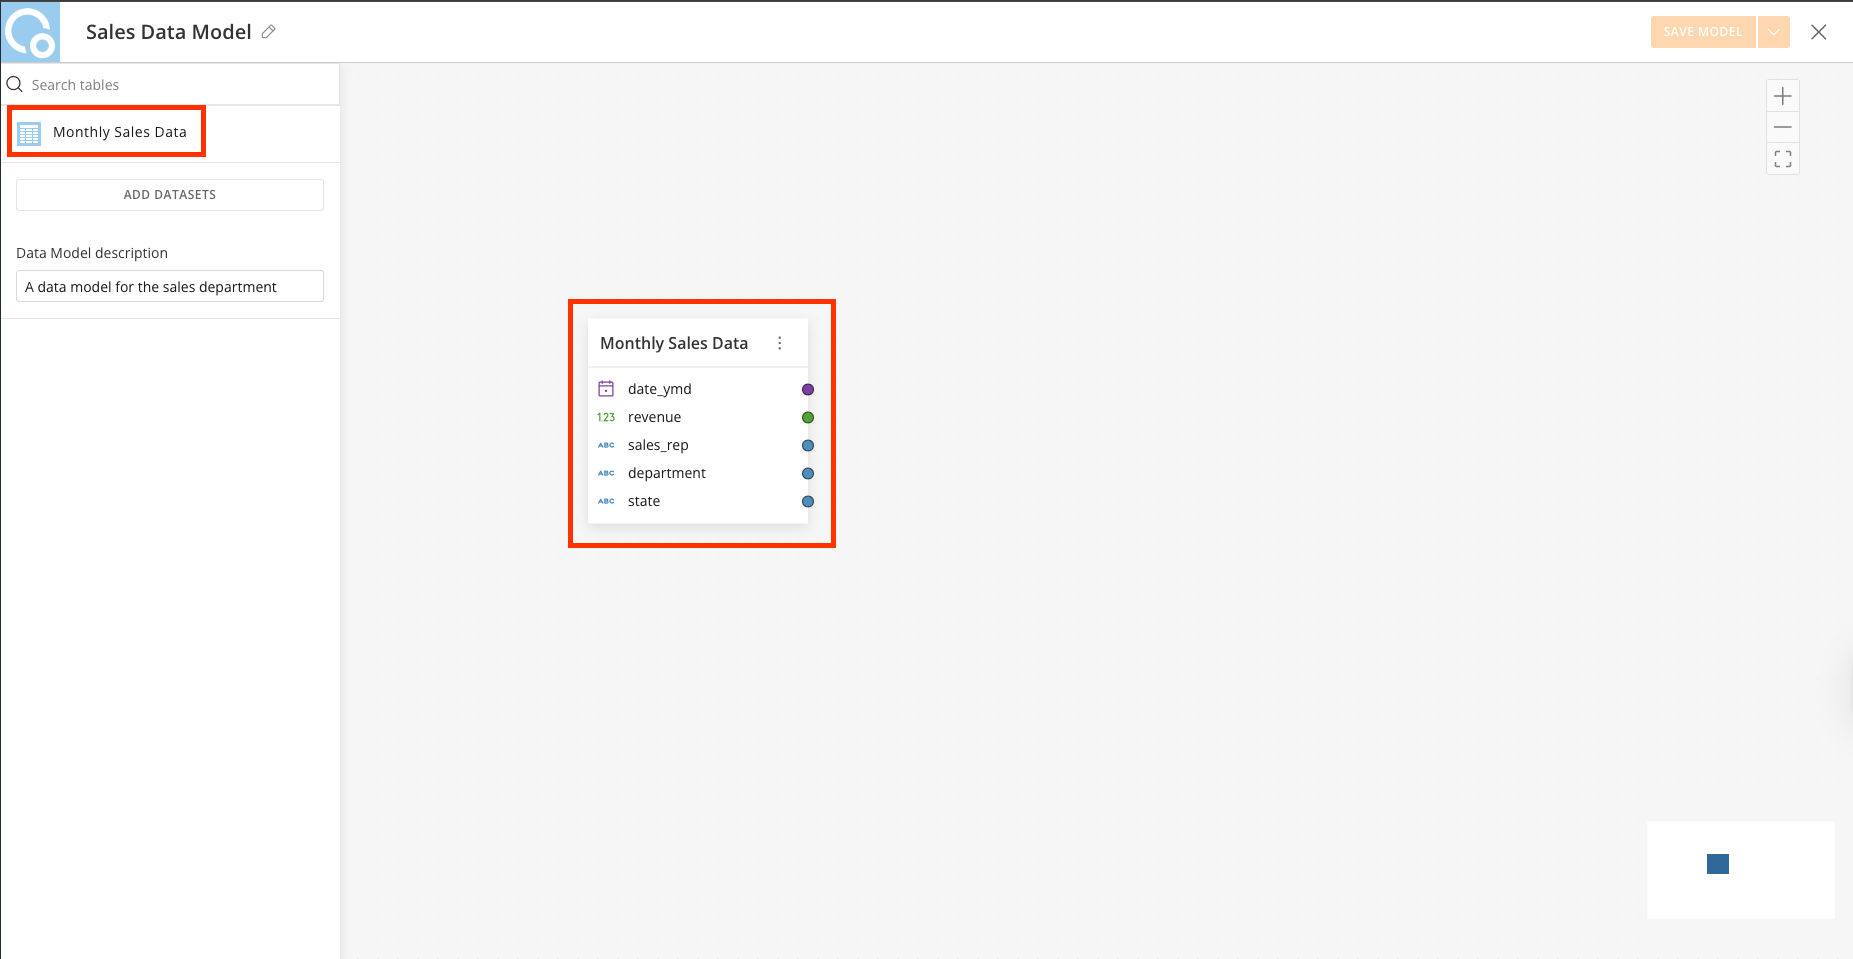
 3. The DataSet appears as a card on the canvas, showing all of its available columns.
 4. Repeat to add any additional DataSets that should be part of the model.
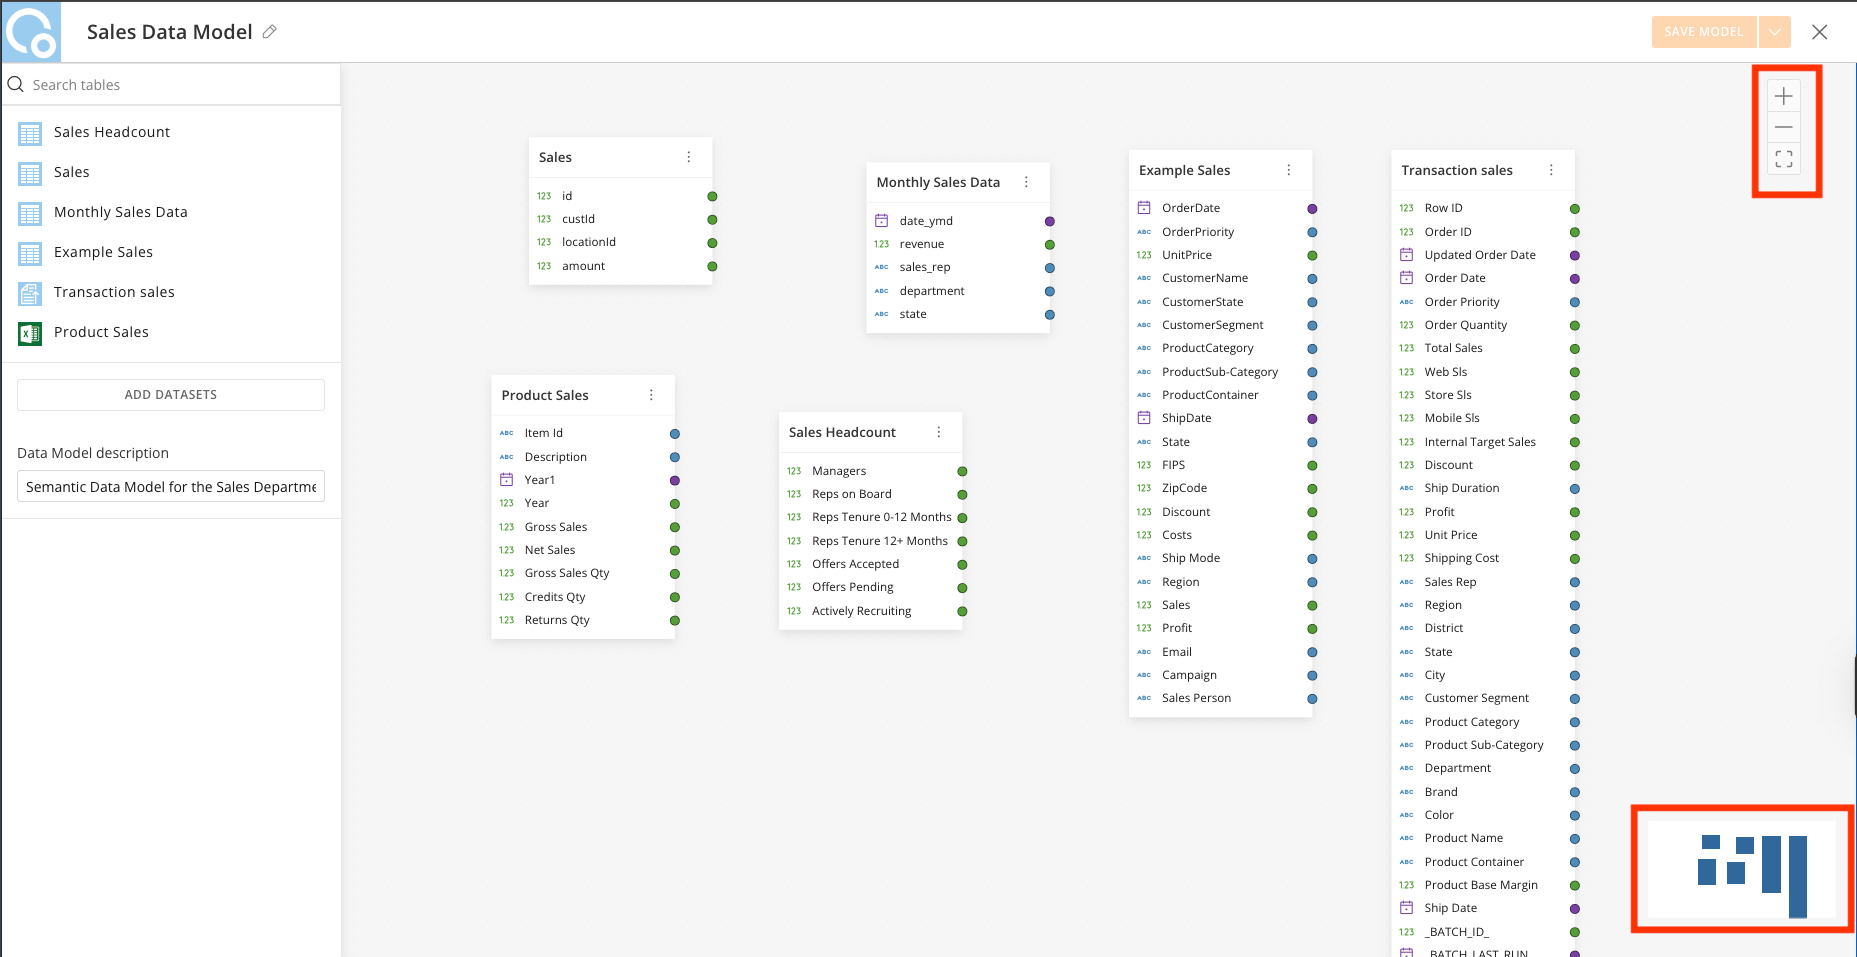
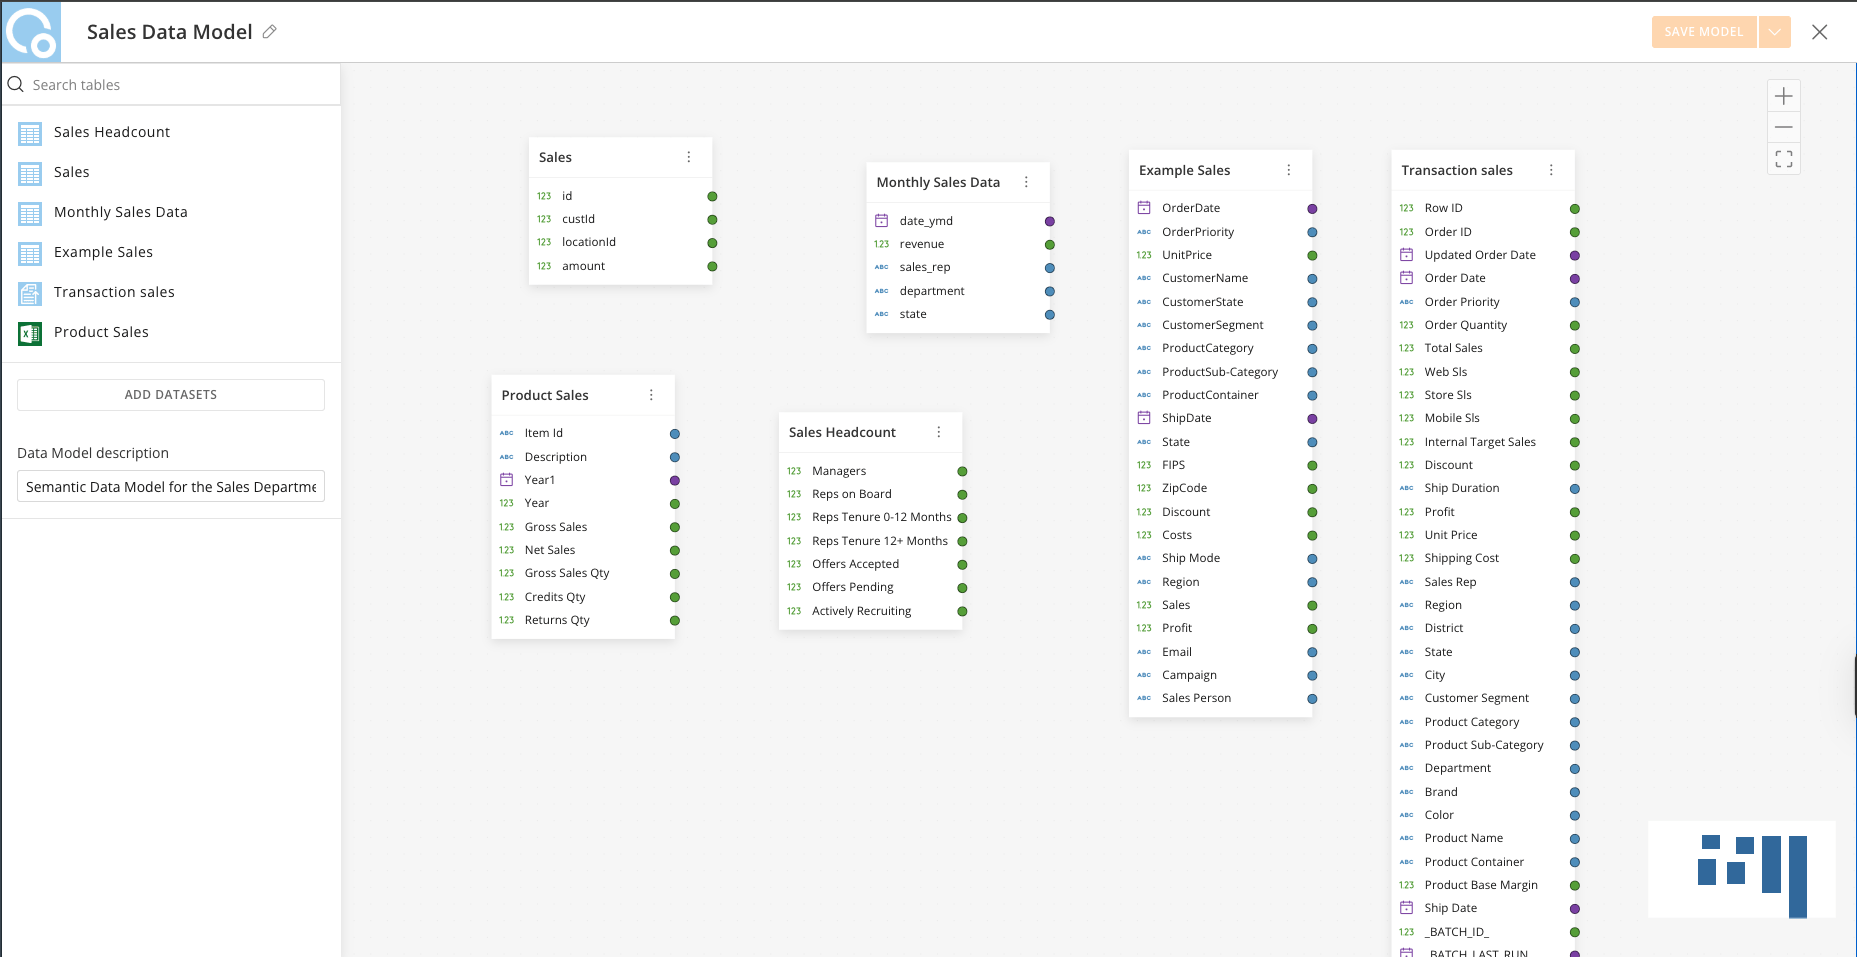 **Tip:** For large Data Models with many tables, you can navigate the canvas in several ways: use the zoom out, zoom in, center canvas, and mini-map controls; scroll with two fingers on a trackpad; or hold the middle mouse button and drag to pan. Drag DataSet cards to rearrange them and keep the layout easy to read.
 ## Define Relationships Between DataSets
After your DataSets are on the canvas, connect them by dragging from a key column in one DataSet to the matching key column in another.
1. Hover over the join key column in one DataSet.
2. Drag from that column to the corresponding key column in the related DataSet.
A relationship line appears connecting the two tables.
3. Select the relationship line to review or edit its settings:
* **Relationship Keys —** the columns on each side of the join (for example, `Account UID` on the Accounts table joined to `Account UID` on the Orders table).
* **Cardinality —** the nature of the relationship between the two tables:
* **One-to-Many —** one record in the first table relates to many records in the second (for example, one Account can have many Orders).
* **Many-to-One —** many records in the first table relate to one record in the second.
* **One-to-One —** each record in the first table relates to exactly one record in the second.
**Note:** You can relate DataSets from disparate source systems through shared keys in a single model. There is no need for a separate DataFlow per combination.
4. Preview table data and search for columns by selecting a table in the canvas.
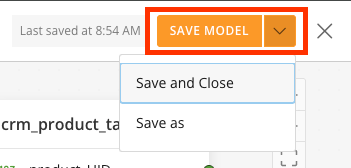
5. Select **Save Model** to preserve your relationship configuration. The following actions are available:
* **Save Model —** saves your configuration without exiting the Editor canvas.
* **Save and Close —** saves your configuration and exits the Editor canvas.
* **Save As —** makes a copy of your model.
## Define Relationships Between DataSets
After your DataSets are on the canvas, connect them by dragging from a key column in one DataSet to the matching key column in another.
1. Hover over the join key column in one DataSet.
2. Drag from that column to the corresponding key column in the related DataSet.
A relationship line appears connecting the two tables.
3. Select the relationship line to review or edit its settings:
* **Relationship Keys —** the columns on each side of the join (for example, `Account UID` on the Accounts table joined to `Account UID` on the Orders table).
* **Cardinality —** the nature of the relationship between the two tables:
* **One-to-Many —** one record in the first table relates to many records in the second (for example, one Account can have many Orders).
* **Many-to-One —** many records in the first table relate to one record in the second.
* **One-to-One —** each record in the first table relates to exactly one record in the second.
**Note:** You can relate DataSets from disparate source systems through shared keys in a single model. There is no need for a separate DataFlow per combination.
4. Preview table data and search for columns by selecting a table in the canvas.
5. Select **Save Model** to preserve your relationship configuration. The following actions are available:
* **Save Model —** saves your configuration without exiting the Editor canvas.
* **Save and Close —** saves your configuration and exits the Editor canvas.
* **Save As —** makes a copy of your model.
 ## Delete Relationships and Objects
To delete all relationships for a table:
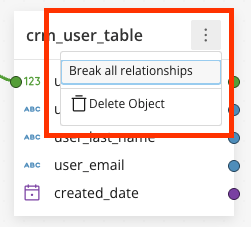
1. Select the three-dot menu in the top-right corner of a table, then select **Break All Relationships**.
## Delete Relationships and Objects
To delete all relationships for a table:
1. Select the three-dot menu in the top-right corner of a table, then select **Break All Relationships**.
 2. Select **Delete** to confirm, or **Cancel** to cancel.
To delete a specific relationship:
1. Select the table.
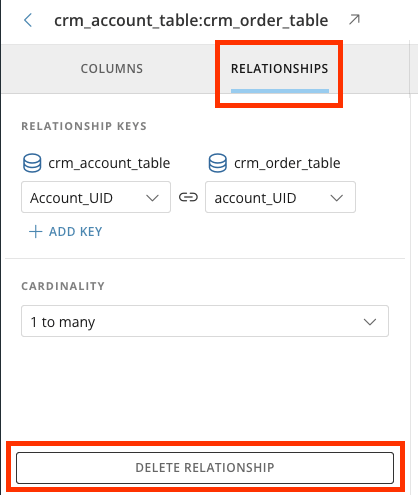
2. Navigate to the **Relationships** tab in the preview modal.
3. Select the relationship you want to delete.
4. Select **Delete Relationship**.
5. Select **Delete** to confirm, or **Cancel** to cancel.
2. Select **Delete** to confirm, or **Cancel** to cancel.
To delete a specific relationship:
1. Select the table.
2. Navigate to the **Relationships** tab in the preview modal.
3. Select the relationship you want to delete.
4. Select **Delete Relationship**.
5. Select **Delete** to confirm, or **Cancel** to cancel.
 ## View the Data Model Landing Page
Each Data Model has a landing page. The landing page displays the model's name, description, and model's attributes such as author,last updated timestamp.
## View the Data Model Landing Page
Each Data Model has a landing page. The landing page displays the model's name, description, and model's attributes such as author,last updated timestamp.
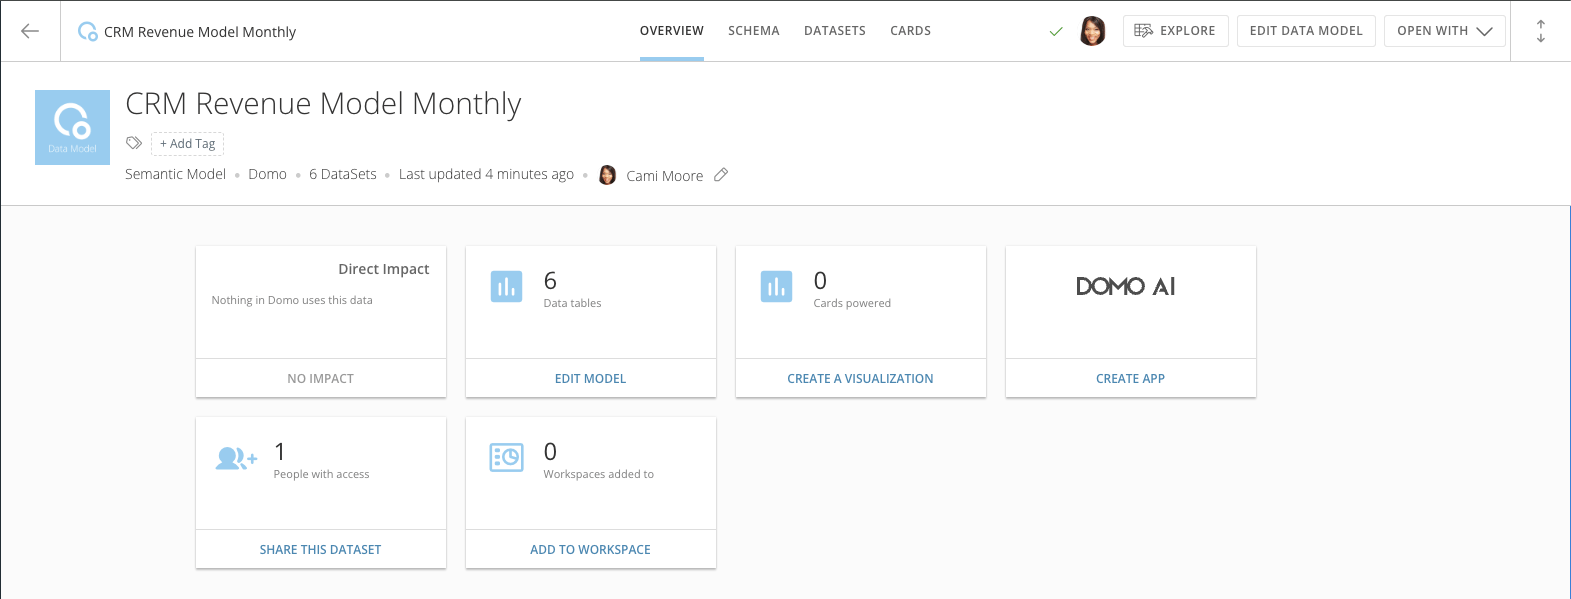 The following actions are available from the top menu:
* **Edit Data Model —** opens the Data Model Editor canvas.
* **Explore —** opens the model in a Worksheet for ad-hoc data exploration.
* **Open With** > **Analyzer —** opens the model in Analyzer.
* **Create Visualization —** creates a visualization card based on the model.
* **Create App —** creates an App Studio app using the model.
* **Share This Dataset —** shares the model with other users.
* **Add to Workspace —** adds the model to a Workspace.
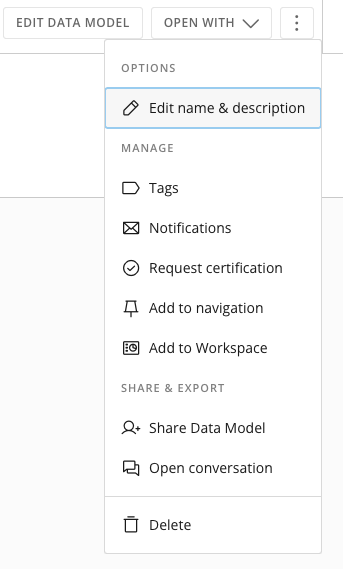
These actions are also available from the three-dot menu in the top-right corner of the landing page.
The following actions are available from the top menu:
* **Edit Data Model —** opens the Data Model Editor canvas.
* **Explore —** opens the model in a Worksheet for ad-hoc data exploration.
* **Open With** > **Analyzer —** opens the model in Analyzer.
* **Create Visualization —** creates a visualization card based on the model.
* **Create App —** creates an App Studio app using the model.
* **Share This Dataset —** shares the model with other users.
* **Add to Workspace —** adds the model to a Workspace.
These actions are also available from the three-dot menu in the top-right corner of the landing page.
 ## Configure the Domo Schema
The Domo Schema lets you enrich each field in your Data Model with metadata. This helps downstream users understand the data and improves the accuracy of AI-assisted features.
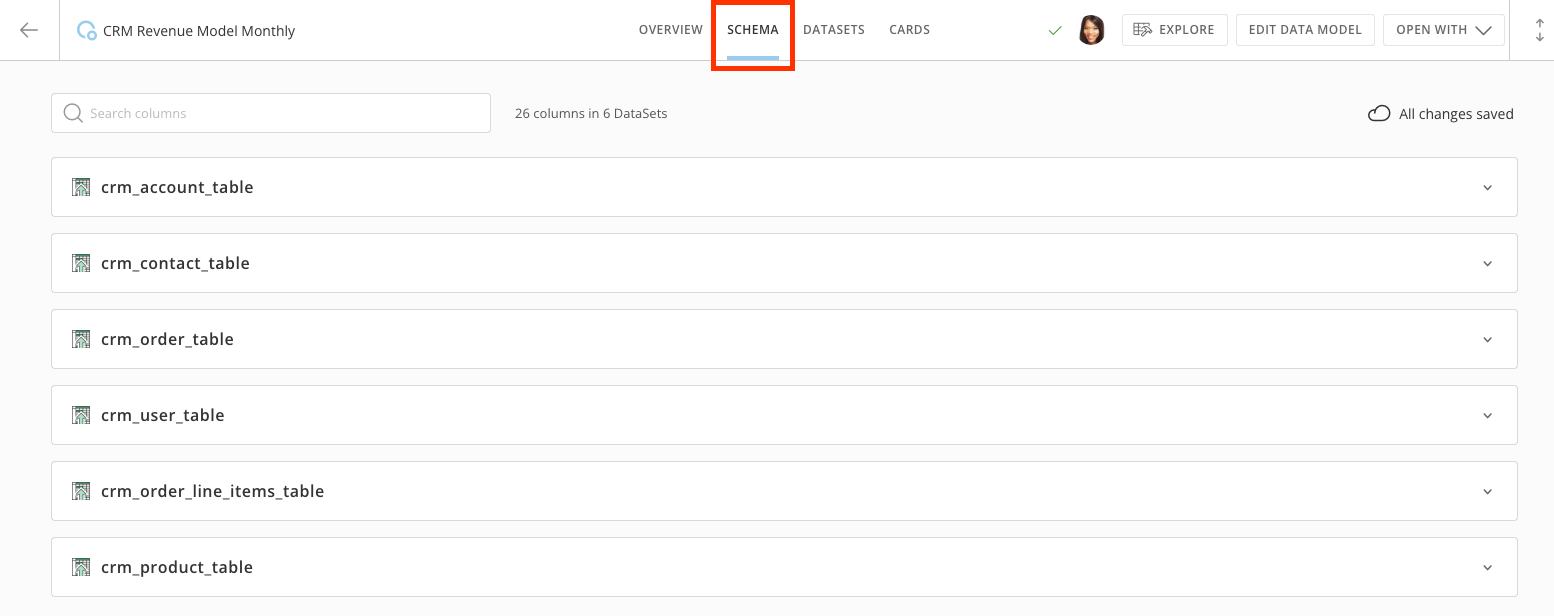
1. Open your Data Model and select the **Schema** tab.
## Configure the Domo Schema
The Domo Schema lets you enrich each field in your Data Model with metadata. This helps downstream users understand the data and improves the accuracy of AI-assisted features.
1. Open your Data Model and select the **Schema** tab.
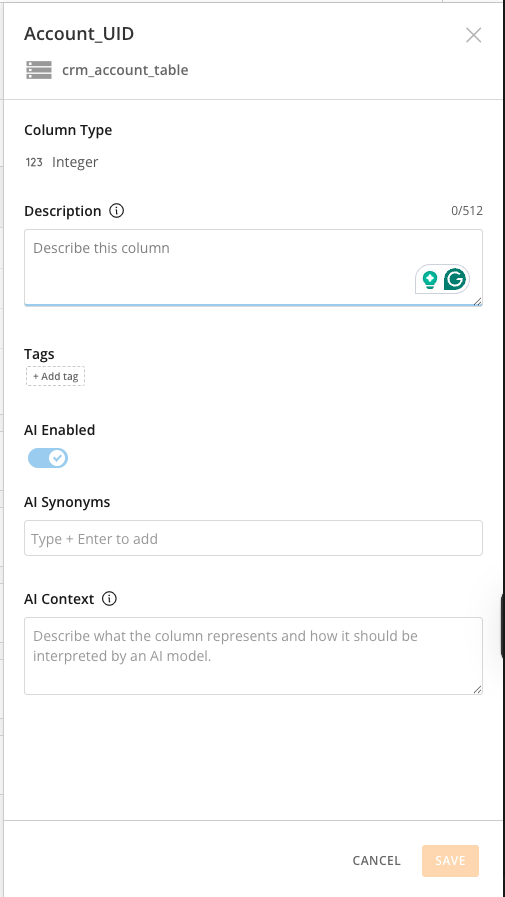
 2. For each dataset and column, you can set the following:
* **Reorder —** control how columns appear in the dataset schema.
* **Description —** document what the field represents.
* **More Options —** additional configuration options for each field.
* **Tags —** help users search and discover fields.
* **AI Enabled —** enable columns to be discovered by Domo AI.
* Add **AI Synonyms** and **AI Context** to improve how Domo AI interprets natural language queries against this model.
2. For each dataset and column, you can set the following:
* **Reorder —** control how columns appear in the dataset schema.
* **Description —** document what the field represents.
* **More Options —** additional configuration options for each field.
* **Tags —** help users search and discover fields.
* **AI Enabled —** enable columns to be discovered by Domo AI.
* Add **AI Synonyms** and **AI Context** to improve how Domo AI interprets natural language queries against this model.

 3. Select **Save** after making your changes.
**Tip:** Well-documented fields in the Schema tab significantly improve the accuracy of answers from Domo AI Chat when users ask questions about data connected through this model.
## Use a Data Model in Analyzer
After a Data Model is created, it is available as a data source in Analyzer—just like any standard DataSet. Columns from all related tables appear together with no additional joining required.
1. Navigate to the dashboard where you want to build a new card.
2. Select **New Card** and select **Visualization**.
3. In the DataSet picker, search for your Data Model by name and select it.
4. Build your card normally. All columns from the model's related DataSets are available in a single view.
**Note:** Because joins happen at query time, card performance may vary depending on the size of the underlying DataSets and the complexity of the relationships in the model.
## Troubleshoot
Review the cardinality settings on your relationship lines in the Editor. A one-to-many or many-to-many relationship can produce multiple rows if the join key is not unique. Verify that the correct key columns are selected on both sides of the relationship.
Schema metadata updates—descriptions, tags, and AI fields—may require a card refresh or re-open to reflect. The underlying data is not affected by Schema tab changes.
Confirm that your Snowflake Cloud Integration is connected and authenticated in your Domo instance. Snowflake tables are available in the DataSet picker only after a successful connection is established.
## Related Articles
* [Creating and Running DataFlows in Magic ETL](/s/article/Creating-and-Running-DataFlows-in-Magic-ETL)
* [Using Beast Mode Calculations](/s/article/Using-Beast-Mode-Calculations)
* [Building Cards in Analyzer](/s/article/Building-Cards-in-Analyzer)
* [Configuring Cloud Integrations (Snowflake)](/s/article/Configuring-Cloud-Integrations-Snowflake)
* [Configuring Domo AI Chat for Your Instance](/s/article/Configuring-Domo-AI-Chat-for-Your-Instance)
* [Domopalooza Release Notes](/s/article/000004968)
3. Select **Save** after making your changes.
**Tip:** Well-documented fields in the Schema tab significantly improve the accuracy of answers from Domo AI Chat when users ask questions about data connected through this model.
## Use a Data Model in Analyzer
After a Data Model is created, it is available as a data source in Analyzer—just like any standard DataSet. Columns from all related tables appear together with no additional joining required.
1. Navigate to the dashboard where you want to build a new card.
2. Select **New Card** and select **Visualization**.
3. In the DataSet picker, search for your Data Model by name and select it.
4. Build your card normally. All columns from the model's related DataSets are available in a single view.
**Note:** Because joins happen at query time, card performance may vary depending on the size of the underlying DataSets and the complexity of the relationships in the model.
## Troubleshoot
Review the cardinality settings on your relationship lines in the Editor. A one-to-many or many-to-many relationship can produce multiple rows if the join key is not unique. Verify that the correct key columns are selected on both sides of the relationship.
Schema metadata updates—descriptions, tags, and AI fields—may require a card refresh or re-open to reflect. The underlying data is not affected by Schema tab changes.
Confirm that your Snowflake Cloud Integration is connected and authenticated in your Domo instance. Snowflake tables are available in the DataSet picker only after a successful connection is established.
## Related Articles
* [Creating and Running DataFlows in Magic ETL](/s/article/Creating-and-Running-DataFlows-in-Magic-ETL)
* [Using Beast Mode Calculations](/s/article/Using-Beast-Mode-Calculations)
* [Building Cards in Analyzer](/s/article/Building-Cards-in-Analyzer)
* [Configuring Cloud Integrations (Snowflake)](/s/article/Configuring-Cloud-Integrations-Snowflake)
* [Configuring Domo AI Chat for Your Instance](/s/article/Configuring-Domo-AI-Chat-for-Your-Instance)
* [Domopalooza Release Notes](/s/article/000004968)